Skip the complicated frosting and make a simple icing that actually works. This 4 Ingredient Sugar Cookie Icing is smooth, shiny, and sets firm enough for stacking. It’s perfect for decorating cut-out cookies with kids or adding a polished finish to holiday bakes.
You can keep it plain and glossy or tint it any color. Best of all, it comes together in one bowl with pantry staples and no special tools.
Table of Contents
Table of Contents
What Makes This 4 Ingredient Sugar Cookie Icing So Good

- Just four ingredients. You likely have everything on hand: powdered sugar, milk, light corn syrup, and vanilla.
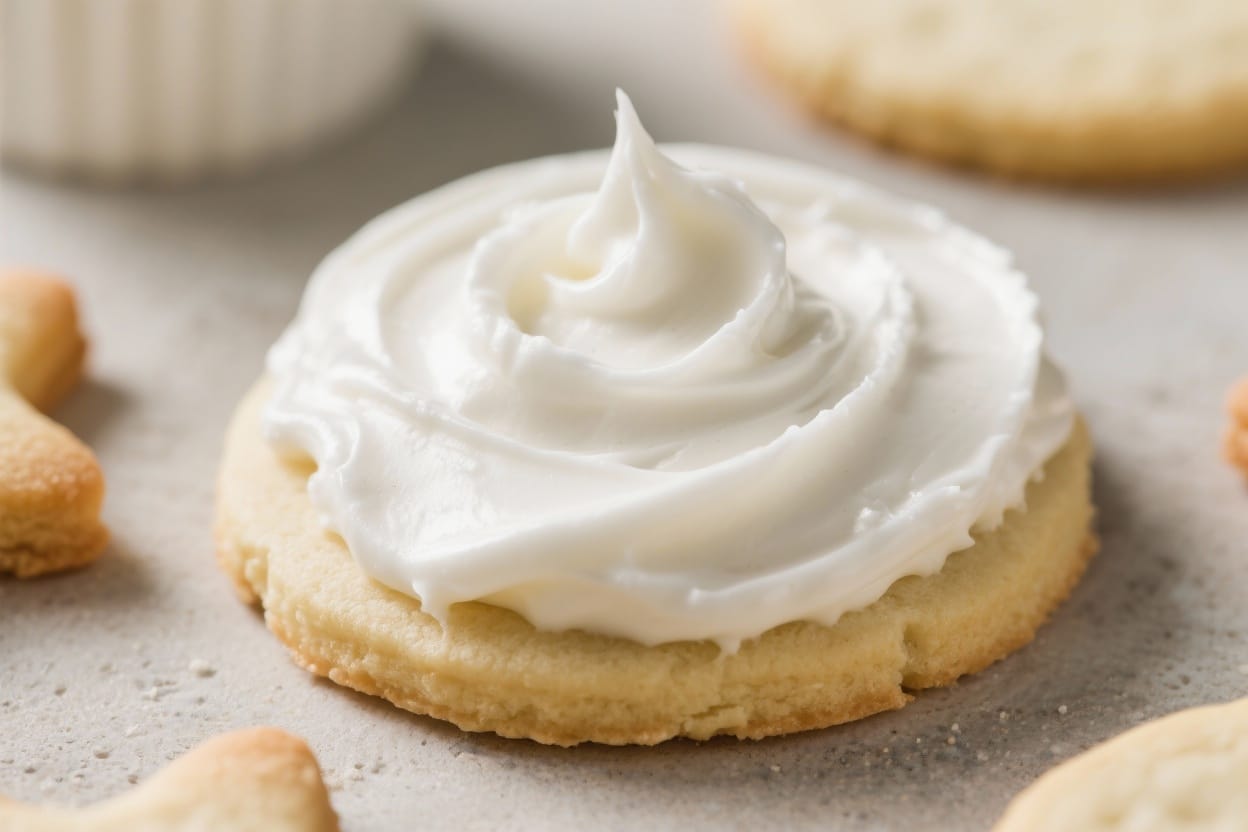
- It sets with a soft, glossy finish. The corn syrup helps the icing dry smooth and shiny without being rock hard.
- Foolproof consistency. You can adjust it in seconds: a touch more milk to thin, a spoon of sugar to thicken.
- Perfect for outlining and flooding. Make one batch and tweak small portions for different decorating steps.
- Easy to color and flavor. Gel food coloring won’t thin it out, and simple extracts can change the vibe fast.
Shopping List
- Powdered sugar (confectioners’ sugar) – 2 cups, sifted if lumpy
- Milk – 2 to 3 tablespoons (start with 2), any kind; water works in a pinch
- Light corn syrup – 2 teaspoons, for shine and a smooth set
- Vanilla extract – 1 teaspoon (clear vanilla if you want a bright white icing)
Step-by-Step Instructions

- Start with the sugar. Add the powdered sugar to a medium bowl. If it looks clumpy, sift it first.
Smooth sugar equals smooth icing.
- Mix in the liquids. Add 2 tablespoons milk, the corn syrup, and the vanilla. Stir slowly with a spoon or small whisk until no dry pockets remain.
- Adjust the texture. For outlining, aim for a thick, toothpaste-like consistency. For flooding, aim for a ribbon that disappears back into the bowl in about 10–12 seconds.
Add milk a teaspoon at a time to thin or powdered sugar a tablespoon at a time to thicken.
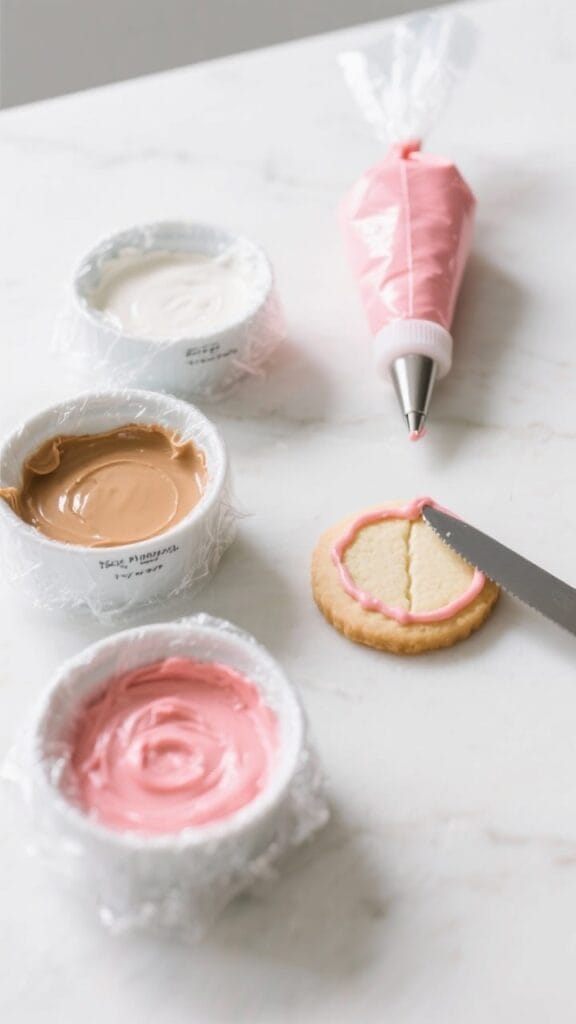
- Test before you decorate. Drag a knife through the icing in the bowl. If the line disappears in about 10 seconds, it’s good for flooding. If it holds its shape, it’s better for outlining.
- Color as needed. Divide icing into small bowls.
Add gel food coloring a little at a time and mix. Keep each bowl covered with plastic wrap touching the surface so it doesn’t crust.
- Prep your tools. Spoon thick icing into piping bags fitted with small round tips (like #2) for outlining. Use squeeze bottles or piping bags without tips for flooding.
- Outline the cookies. Pipe a thin border around each cookie.
Let it sit for 2–3 minutes to set slightly.
- Flood the centers. Fill the outline with thinner icing. Use a toothpick or scribe tool to nudge icing into corners and pop any air bubbles.
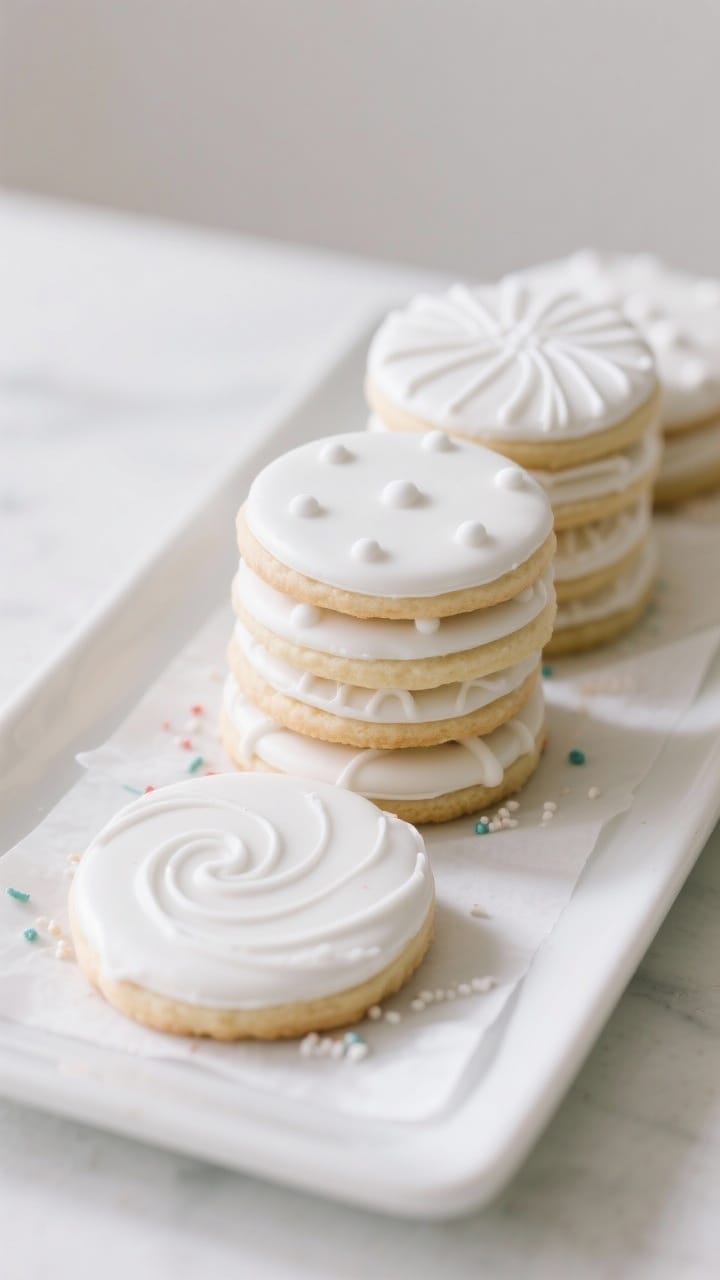
- Add details. For layered designs, let the base coat dry 30–60 minutes before adding more lines, dots, or patterns. For a “wet-on-wet” marbled look, add contrasting icing immediately and swirl lightly.
- Dry completely. Leave cookies uncovered at room temperature.
The surface will crust after 1 hour, but for stacking and packing, give them 8–12 hours or overnight.
How to Store
- Fresh icing: Press plastic wrap directly on the surface and cover the bowl. Store at room temperature for up to 2 days or refrigerate for up to 1 week. Stir and adjust with a drop of milk if it thickens.
- Colored icing: Keep in piping bags or squeeze bottles with caps.
If the tip crusts, poke with a toothpick and knead the bag gently.
- Decorated cookies: Once fully dry, store in an airtight container at room temperature for up to 1 week. Separate layers with parchment.
- Freezing: You can freeze decorated cookies. Freeze in a single layer until firm, then stack with parchment and seal.
Thaw in the container to avoid condensation on the icing.
Benefits of This 4 Ingredient Sugar Cookie Icing
- Quick and flexible. One bowl, no mixer required, and easy to adjust mid-decorating.
- Kid-friendly. Simple steps and fast dry time make it a great weekend project.
- Reliable finish. The corn syrup prevents cracking and gives a pretty sheen.
- Budget-friendly. Pantry ingredients beat store-bought bottles or specialty mixes.
- Customizable. Works with any color palette or theme, from birthdays to holidays.
Pitfalls to Watch Out For
- Over-thinning. Too much milk makes icing runny and dull. Always add liquid by the teaspoon, not tablespoon.
- Skipping the cover. Icing crusts fast. Keep bowls and bags covered when you’re not using them.
- Using liquid food coloring. It can thin the icing too much.
Gel colors are best.
- Not letting layers dry. Adding details too soon can cause bleeding. Let the base coat set at least 30 minutes for crisp lines.
- Humidity issues. Very humid kitchens slow drying and can dull the shine. Use a fan on low or move to a drier room.
Alternatives
- No corn syrup: Replace with 1 teaspoon lemon juice or honey.
The finish won’t be as glossy, but it will still set.
- Dairy-free: Use water or a neutral non-dairy milk (oat, almond). Start with slightly less and adjust.
- Flavor twists: Swap vanilla for almond, lemon, orange, or peppermint extract. Start with 1/2 teaspoon and add to taste.
- Colored icing without tinting: Use cocoa powder for brown, matcha for green, or freeze-dried berry powder for pink.
Add a little extra milk if powders thicken the icing.
- Glaze option: Omit corn syrup and thin with milk for a simple glaze that stays softer and slightly matte.
FAQ
How long does this icing take to dry?
Most cookies crust over in about 1 hour at room temperature. For stacking or packaging, wait 8–12 hours or overnight until fully dry.
Can I make the icing ahead of time?
Yes. Store in an airtight container for up to a week in the fridge.
Bring to room temperature, stir well, and adjust with a tiny splash of milk if needed.
What’s the best way to get bright white icing?
Use clear vanilla instead of regular vanilla, and make sure your powdered sugar is fresh. A drop of white gel food coloring boosts brightness.
Why is my icing dull or sticky?
Too much liquid or high humidity can cause this. Add a little powdered sugar to thicken, and let cookies dry longer in a cool, dry spot.
A small fan helps.
Can I use this icing on other cookies or cakes?
Yes. It’s great on shortbread, graham crackers, and simple bars. It’s not ideal for frosting layer cakes because it sets firm rather than fluffy.
What tip size should I use?
A small round tip like #2 works for most outlining and details.
For flooding, you can use the same tip or a tipless piping bag with a small snip.
How do I prevent color bleeding?
Let each color set before adding a contrasting color beside it. Keep icing on the thicker side for outlines, avoid overfilling, and allow good drying time.
Is this the same as royal icing?
No. Royal icing typically uses egg whites or meringue powder and dries very hard.
This version uses corn syrup for a softer bite and shiny finish.
In Conclusion
This 4 ingredient sugar cookie icing is the reliable, no-stress way to decorate cookies that look polished and taste great. It mixes up in minutes, sets with a pretty gloss, and adapts easily for outlines, flooding, and fine details. Keep the base simple, then customize colors and flavors to match any occasion.
With a few bowls, some gel colors, and a steady hand, you’ll have bakery-style cookies without the fuss.
4 Ingredient Sugar Cookie Icing – Simple, Smooth, and Ready in Minutes
Ingredients
Method
- Start with the sugar. Add the powdered sugar to a medium bowl. If it looks clumpy, sift it first.Smooth sugar equals smooth icing.
- Mix in the liquids. Add 2 tablespoons milk, the corn syrup, and the vanilla. Stir slowly with a spoon or small whisk until no dry pockets remain.
- Adjust the texture. For outlining, aim for a thick, toothpaste-like consistency. For flooding, aim for a ribbon that disappears back into the bowl in about 10–12 seconds.Add milk a teaspoon at a time to thin or powdered sugar a tablespoon at a time to thicken.
- Test before you decorate. Drag a knife through the icing in the bowl. If the line disappears in about 10 seconds, it’s good for flooding. If it holds its shape, it’s better for outlining.
- Color as needed. Divide icing into small bowls.Add gel food coloring a little at a time and mix. Keep each bowl covered with plastic wrap touching the surface so it doesn’t crust.
- Prep your tools. Spoon thick icing into piping bags fitted with small round tips (like #2) for outlining. Use squeeze bottles or piping bags without tips for flooding.
- Outline the cookies. Pipe a thin border around each cookie.Let it sit for 2–3 minutes to set slightly.
- Flood the centers. Fill the outline with thinner icing. Use a toothpick or scribe tool to nudge icing into corners and pop any air bubbles.
- Add details. For layered designs, let the base coat dry 30–60 minutes before adding more lines, dots, or patterns. For a “wet-on-wet” marbled look, add contrasting icing immediately and swirl lightly.
- Dry completely. Leave cookies uncovered at room temperature.The surface will crust after 1 hour, but for stacking and packing, give them 8–12 hours or overnight.