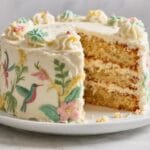
Baking has always been my love language, but after 40 years in the kitchen, I’ve realized that a cake shouldn’t just be food—it should be a masterpiece. The Buttercream Oil Painting Cake is exactly that. If you have ever looked at a canvas and wished you could eat the flowers, this is the recipe for you. I’m going to walk you through the exact “impasto” technique I’ve used to wow clients for decades, ensuring your buttercream stays stable while you “paint” your heart out.
Table of Contents
Why You’ll Love This Palette Knife Cake Decorating Tutorial
When you bring a Buttercream Oil Painting Cake to a party, you aren’t just bringing dessert; you’re bringing a conversation piece. Here is why this recipe is a game-changer:
- No Piping Bags Required: If you struggle with traditional piping tips, the palette knife technique is much more forgiving and creative.
- Professional Results at Home: You’ll learn how to create a high-end, luxury look that typically costs hundreds of dollars at a boutique bakery.
- Stress-Free Decorating: Unlike smooth fondant, this style embraces texture. If you make a mistake, you just blend it in—it’s art!
- Elite Stability: We use a specific Swiss Meringue base that won’t melt while you work.
Ingredients Needed For Best Buttercream for Flowers

For the “Oil Paint” (Swiss Meringue Buttercream)
- 5 Large Egg Whites: Room temperature is non-negotiable for a stable foam.
- 1 ½ Cups Superfine Sugar: Dissolves faster for a silky finish.
- 2 Cups Unsalted Butter: Slightly cool, but softened enough to dent with a finger.
- 1 Tablespoon Clear Vanilla Extract: Keeps the “canvas” white.
- Pinch of Salt: To cut the sweetness and balance the richness.
- Gel Food Coloring: Use high-pigment gels (Pink, Yellow, Orange, Green) to avoid thinning the frosting.
For the Canvas (The Cake)
- 3 Layers of Vanilla Sponge: Chilled thoroughly to prevent crumbs from lifting.
- Offset Spatula: For the base coat.
- Small Palette Knives: Various shapes (teardrop, pointed) for the floral details.
How to Make a Buttercream Oil Painting Cake

1. Create the Swiss Meringue Base
Whisk egg whites and sugar over a double boiler until the sugar is completely dissolved (reaching 160°F). Transfer to a stand mixer and whisk on high until stiff, glossy peaks form and the bowl is cool to the touch. This provides the structural integrity needed for the “painting” layers.
2. Incorporate the Butter
Switch to the paddle attachment. Add butter one tablespoon at a time. Do not panic if it looks curdled; keep beating until it transforms into a smooth, buttery silk. This is the perfect medium for your palette knife.
3. Prepare the “Canvas”
Apply a thick crumb coat to your chilled cake layers. Smooth it with an offset spatula and chill for 30 minutes. Apply a final smooth coat of white buttercream. Pro Tip: A cold cake is essential so the “oil paint” petals don’t slide off.
4. Mix Your Colors
Divide small portions of buttercream into bowls. Use a toothpick to add gel color. For an authentic oil painting effect, don’t mix the color perfectly—streaks of white and dark shades add depth to your petals.
5. The Palette Knife Technique
To create the flowers seen in the image:
- Scoop a small amount of colored buttercream onto the back of a palette knife.
- Press the knife against the cake and drag it toward the center of your “flower.”
- Lift the knife quickly to create a textured “flick” at the end of the petal.
- Layer the petals, starting from the outside and working in.
Expert Tips for Success
- Control the Temperature: If your hands are warm, the palette knife will melt the buttercream. Dip your knives in ice water and dry them frequently to keep the edges of your petals sharp.
- The “Double Scoop” Secret: Dip your knife into two colors at once (e.g., yellow and orange) before applying to the cake. This creates the painterly dimension found in professional oil paintings.
- Clean Your Tools: Wipe your palette knife after every single petal. A dirty knife leads to “muddy” colors.
Serving and Storage Professional Cake Decorating Tips
This cake is best served at room temperature to appreciate the silky texture of the Swiss Meringue. However, store it in the fridge until 2 hours before the event. If you have leftovers, the buttercream “flowers” will stay perfectly intact for up to 3 days in an airtight container.
Frequently Asked Questions
Can I use American Buttercream for oil painting?
You can, but it is much harder. American buttercream forms a “crust” quickly, which prevents the colors from blending naturally. Swiss Meringue stays workable for much longer.
What palette knives should I buy?
Look for a set of stainless steel artistic palette knives. The plastic ones are too thick and won’t give you those delicate, sharp petal edges.
How do I fix a mistake?
The beauty of the Buttercream Oil Painting Cake is the texture! If you don’t like a flower, let it chill in the fridge until hard, scrape it off gently with a warm knife, and paint over the spot.
Conclusion
Creating a Buttercream Oil Painting Cake is a meditative and rewarding process. It’s about letting go of perfection and embracing the movement of the frosting. I’ve found that my students who approach the cake like a canvas always produce the most stunning results. You have the secret recipe and the professional techniques—now it’s time to create your masterpiece.
Tell me in the comments: What flower are you most excited to “paint” on your cake? If you loved this tutorial, please give it a 5-star rating below!

Professional Buttercream Oil Painting Cake
Ingredients
Method
- Whisk egg whites and sugar over a double boiler until temperature reaches 160°F and sugar is dissolved.
- Whip the mixture in a stand mixer until stiff, glossy peaks form and the bowl is cool to the touch.
- Slowly add cubed butter while mixing on medium speed until smooth and silky.
- Apply a smooth base coat to a chilled cake and return to the fridge for 30 minutes.
- Use palette knives to scoop colored buttercream and ‘paint’ floral textures onto the cold cake surface.