Caramel brownies are the absolute pinnacle of dessert decadence, combining rich, fudgy cocoa with ribbons of molten, buttery sweetness. Welcome to my kitchen. I am Chef Luna, and over my 40 years of crafting elite culinary masterpieces in professional pastry kitchens, I have perfected the exact science of baking the ultimate chocolate dessert.
You are not just making a sweet treat today; you are learning the architecture of flavor. When you bite into a properly constructed caramel brownie, you experience a textural symphony: the crinkly, paper-thin top, the dense, truffle-like center, and the luscious pull of golden caramel.
For decades, my private clients have begged me for this exact formula. Today, I am giving you my closely guarded secrets. Whether you are baking entirely from scratch or looking to elevate a weeknight dessert by making caramel brownies using brownie mix, the techniques I outline below will guarantee a bakery-quality result that will leave everyone speechless. Let’s get to work.
Table of Contents
Why You Will Love This caramel brownies Recipe
There is a distinct difference between a good dessert and an unforgettable one. You will love this approach because it eliminates the guesswork and delivers pure, unadulterated perfection every single time.
- Expert Precision Made Simple: I have translated complex pastry techniques into a simple, foolproof process you can execute in your home kitchen.
- The Best Texture Profile: No dry, cakey squares here. This is the ultimate fudgy, dense caramel brownie recipe engineered for maximum moisture.
- No-Bake Caramel Layering: We use a specific temperature control method to ensure the caramel stays soft and gooey, even after the brownies have completely cooled.
- Incredible Versatility: This master recipe provides the foundation for the most luxurious chocolate caramel brownies you will ever taste, easily adaptable to your schedule.
Perfect for Hosting and Parties
When you are entertaining, you need a dessert that commands the room. Slicing into a pan of these beautifully marbled caramel and chocolate brownies reveals a stunning cross-section that looks incredibly difficult to achieve but is deceptively easy. Your guests will marvel at the glistening pockets of sweet caramel contrasting with the dark, intense chocolate. Because they are incredibly rich, a single pan goes a long way, making them the ultimate crowd-pleaser for dinner parties, holiday gatherings, or upscale bake sales.
Ingredients You Need
To achieve a masterpiece, you must respect your ingredients. The quality of what you put into the bowl directly dictates the caliber of your final product.
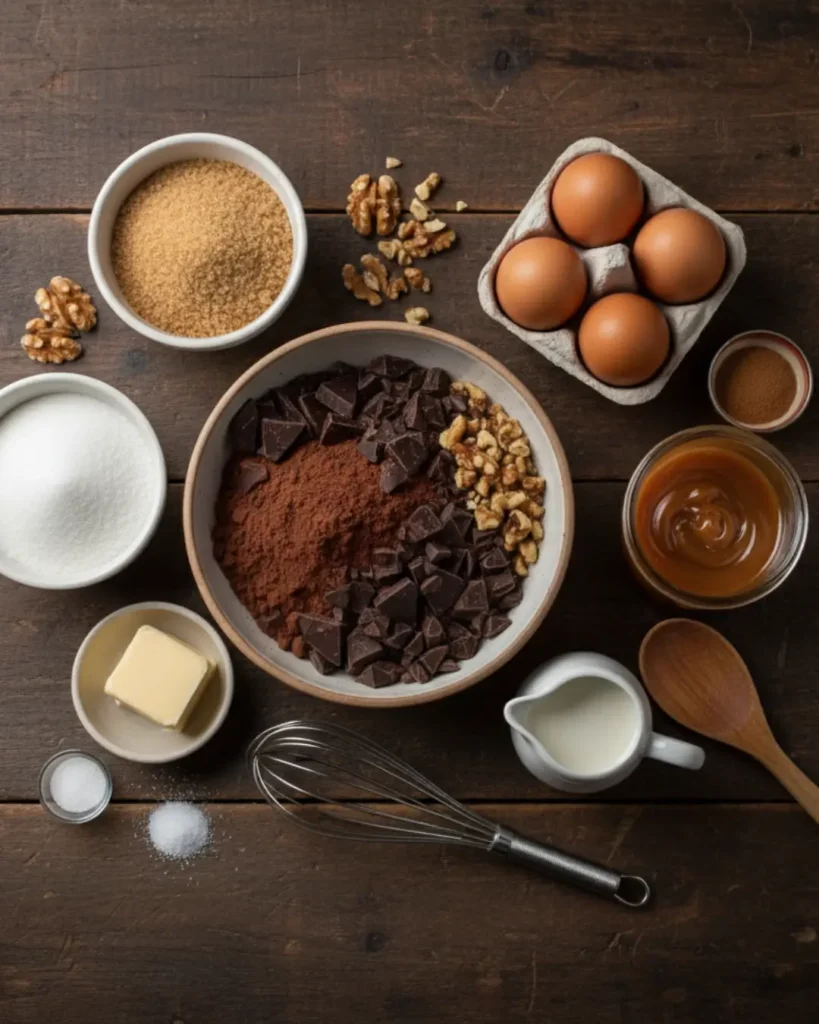
- High-Quality Unsalted Butter: European-style butter (82% butterfat) is preferred for a richer mouthfeel.
- Dark Chocolate (70% Cacao): Do not use chocolate chips for the batter; they contain stabilizers. Use high-quality baking bars.
- Dutch-Processed Cocoa Powder: This provides that deep, dark, intense bakery-style color and smooth chocolate flavor.
- Granulated Sugar & Dark Brown Sugar: The molasses in the dark brown sugar is the secret to a chewy texture.
- Large Eggs: Room temperature. This is non-negotiable for proper emulsification.
- Pure Vanilla Extract: Do not use imitation vanilla.
- All-Purpose Flour: Measured perfectly using a digital kitchen scale (or the spoon-and-level method).
- High-Quality Soft Caramel Candies or Heavy Cream Caramel: For melting down into our luxurious ribbons.
- Flaky Sea Salt: Maldon or Fleur de Sel. This is the expert touch that balances the intense sweetness of the caramel.
Chef Luna’s Secret Hack: If you are extremely short on time, you can create incredible caramel brownies using brownie mix. Purchase a premium dark chocolate boxed mix, replace the water with brewed espresso, use melted butter instead of oil, and follow my caramel layering technique below. It will taste completely homemade!
How to Make caramel brownies
Pay close attention to these steps. Baking is a science, and as a chef, I demand precision. Follow my instructions, and you will achieve flawless results.
1. Prepare Your Pan and Oven Preheat your oven to 350°F (175°C). Line an 8×8-inch light-colored metal baking pan with parchment paper, leaving an overhang on two sides to act as a sling. A light-colored pan prevents the edges from overbaking before the center is done.
2. Melt the Chocolate and Butter In a heatproof bowl set over a saucepan of gently simmering water (a bain-marie), melt the butter and chopped dark chocolate together. Stir continuously with a silicone spatula until smooth and glossy. Remove from heat immediately to prevent the chocolate from seizing.
3. Whip the Eggs and Sugar In a separate large bowl, whisk the eggs, granulated sugar, and dark brown sugar aggressively for at least two to three minutes. You want the mixture to become pale and thick. This process, known as the ribbon stage, dissolves the sugar crystals and creates the coveted papery, crinkly top on your chocolate caramel brownies.
4. Combine and Fold Pour the slightly cooled melted chocolate mixture into the whipped eggs and sugar. Gently fold them together using a figure-eight motion. Do not overmix. Add the vanilla extract.
5. Sift the Dry Ingredients Sift the flour, Dutch-processed cocoa powder, and a pinch of table salt directly over the wet ingredients. Using your spatula, fold the batter gently just until no streaks of dry flour remain. The batter will be exceptionally thick and fudgy.
6. Prepare the Caramel Ribbon If using soft caramel candies, unwrap them and place them in a microwave-safe bowl with one tablespoon of heavy cream. Microwave in 15-second intervals, stirring vigorously in between, until completely smooth and pourable.
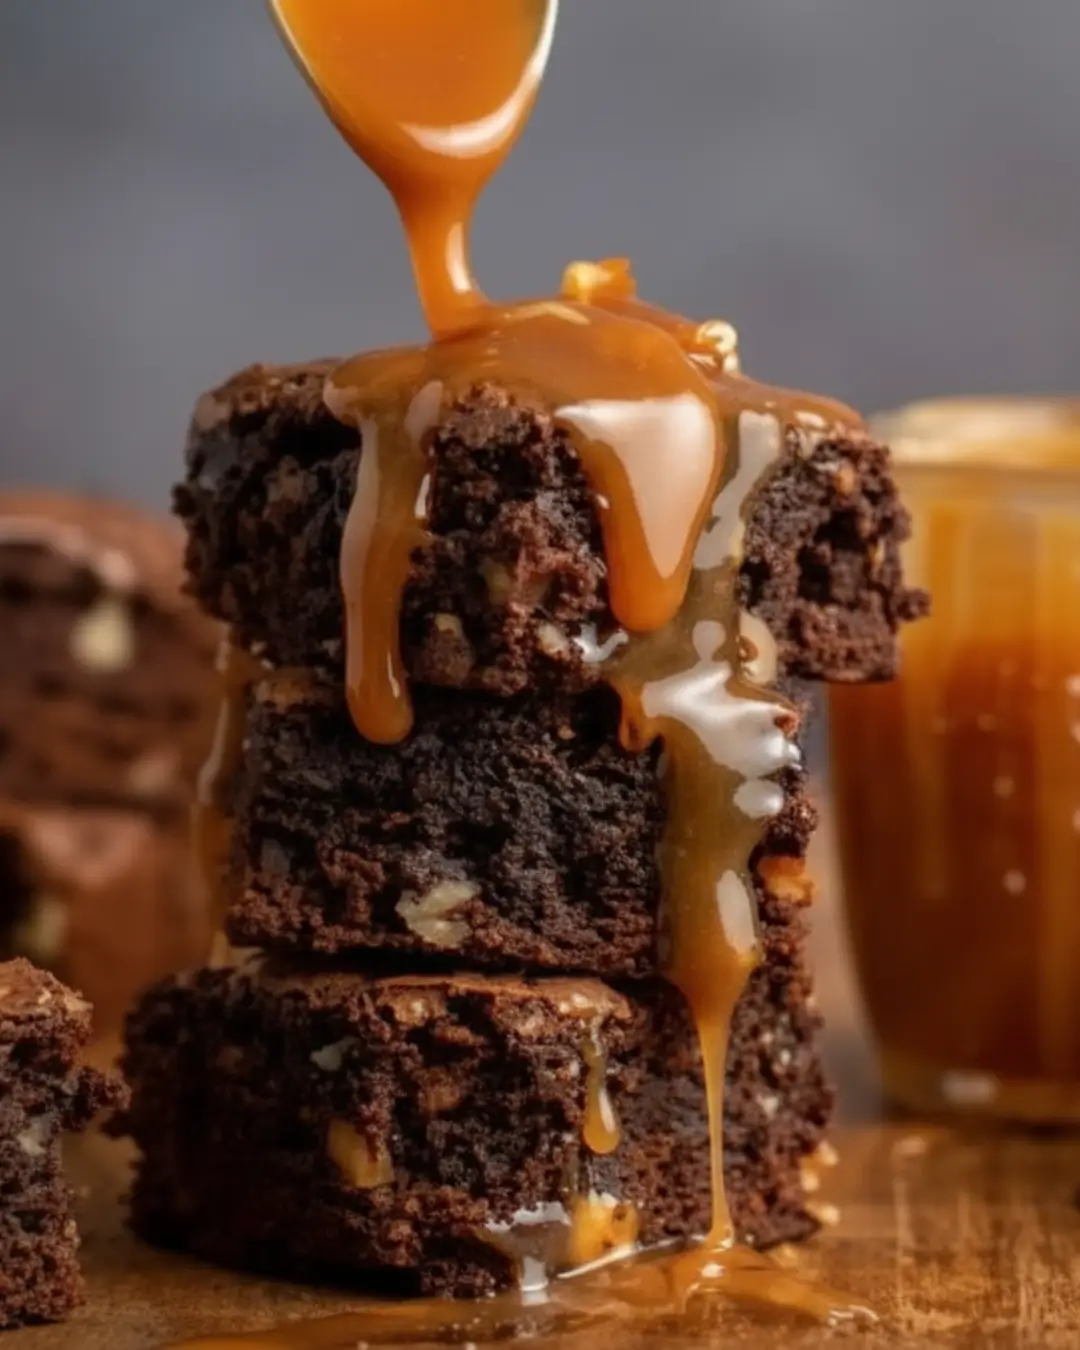
7. The Expert Layering Technique Pour exactly half of the brownie batter into your prepared pan, smoothing it to the edges. Now, pour 80% of your melted caramel evenly over this base layer. Dollop the remaining brownie batter over the caramel layer. Finally, drizzle the remaining caramel over the top. Use a butter knife to swirl the batter and caramel together in a gentle figure-eight pattern. This ensures you have caramel in brownies at every single level, not just baked on top.
8. Bake with Precision Bake for 30 to 35 minutes. You are looking for edges that are set and a center that is just barely pulling away from the sides. A toothpick inserted into the center should come out with moist, thick crumbs not wet batter, and absolutely not clean. Overbaking is the enemy of the perfect caramel and chocolate brownies.
9. The Crucial Cooling Phase Remove the pan from the oven and immediately sprinkle the top with flaky sea salt. You must allow the brownies to cool completely in the pan on a wire rack for at least two hours. If you attempt to cut them while warm, the molten caramel will cause them to collapse.
Expert Tips for Success
In my 40 years of baking, I have seen every mistake a home cook can make. Here is how you bypass amateur errors and bake like a seasoned pastry chef:
- Temperature is Everything: To keep your caramel from turning rock-hard once cooled, never bake the caramel directly on the surface of the brownie without swirling it into the batter. The batter acts as an insulator, protecting the sugars in the caramel from reaching the hard-crack stage in the oven heat.
- The Drop Technique: Halfway through baking, carefully take the pan and drop it evenly on the oven rack from a height of about one inch. This forces trapped air bubbles to escape, resulting in an ultra-dense, intensely fudgy caramel brownie.
- Clean Cuts: To achieve professional, razor-sharp bakery cuts, lift the cooled brownies out of the pan using the parchment sling. Place them in the refrigerator for 30 minutes to firm up the caramel. Run a large chef’s knife under hot water, wipe it completely dry with a towel, and press straight down. Clean and reheat the blade between every single slice.
Frequently Asked Questions
How long does a caramel brownie recipe stay fresh?
When stored correctly, these brownies possess an excellent shelf life. Keep them in an airtight container at room temperature for up to 4 days. The dense nature of the crumb prevents them from drying out quickly. If you prefer a chewier texture, you can store them in the refrigerator for up to a week, but I recommend letting them sit at room temperature for 15 minutes before serving so the caramel softens.
Can I make this ahead of time?
Absolutely. In fact, a caramel brownie actually tastes better on the second day! The complex flavor compounds in the chocolate and the caramel have time to meld and deepen overnight. You can also freeze these brownies tightly wrapped in plastic wrap and aluminum foil for up to three months. Thaw overnight at room temperature.
Conclusion
Mastering these caramel brownies is a milestone for any home baker. By utilizing professional techniques from whipping your eggs to the precise temperature control of your caramel ribbons you elevate a simple concept into a breathtaking dessert. I encourage you to take your time, respect the ingredients, and enjoy the sensory experience of baking. Please leave a rating and let me know in the comments how your masterpiece turned out. Welcome to the elite tier of dessert making.
caramel brownies
Ingredients
Method
- Preheat your oven to 350°F (175°C). Line an 8×8-inch metal baking pan with parchment paper, leaving an overhang on the sides.
- Melt the butter and chopped dark chocolate in a heatproof bowl over simmering water until completely smooth. Remove from heat and let cool slightly.
- In a separate large bowl, whisk the eggs, granulated sugar, and dark brown sugar vigorously for 2-3 minutes until pale and thick.
- Gently fold the melted chocolate mixture into the whipped eggs and sugar. Stir in the vanilla extract.
- Sift the flour, cocoa powder, and table salt over the wet ingredients. Fold gently with a spatula just until no dry flour remains.
- In a microwave-safe bowl, melt the soft caramels with the heavy cream in 15-second intervals, stirring until smooth and pourable.
- Pour half of the brownie batter into the prepared pan. Pour 80% of the melted caramel evenly over the batter. Dollop the remaining batter on top, then drizzle with the rest of the caramel. Use a knife to gently swirl the layers together.
- Bake for 30-35 minutes until the edges are set and a toothpick inserted in the center comes out with moist, thick crumbs.
- Remove from the oven, immediately sprinkle with flaky sea salt, and let cool completely in the pan for at least 2 hours before slicing.