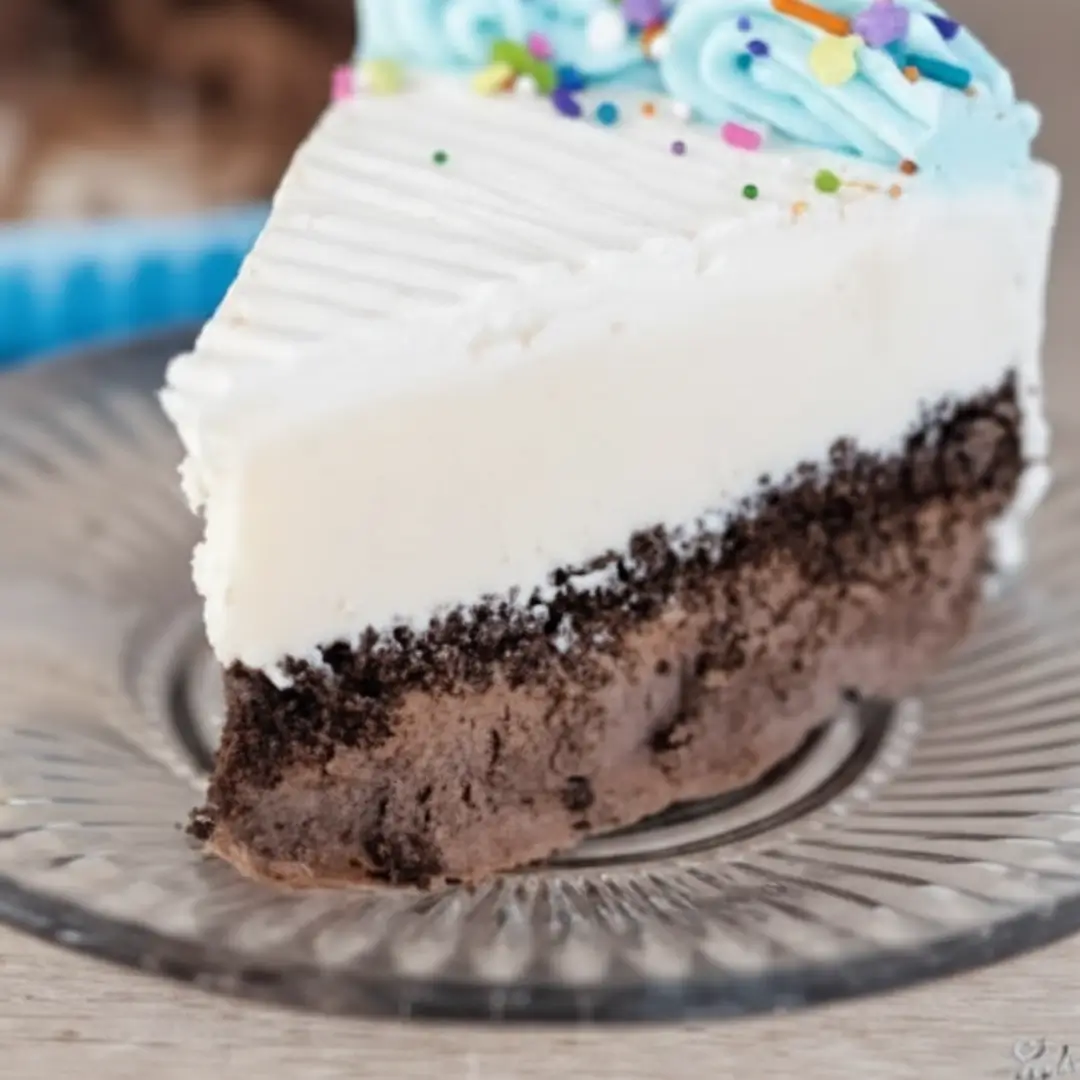
carvel ice cream cake is the ultimate nostalgia trip, and after 40 years as a professional pastry chef, I have perfected the exact method to recreate this masterpiece in your own kitchen. You know the one I am talking about: that glorious, towering disc of smooth vanilla and rich chocolate, separated by a thick, heavenly layer of chocolate fudge and those iconic, irresistible chocolate crunchies.
Throughout my four decades in the culinary industry, I have tasted and constructed thousands of desserts, but there is an undeniable magic to getting this specific, beloved treat exactly right. Today, I am handing my elite secrets directly to you.
Table of Contents
Why You Will Love This carvel ice cream cake
Recreating bakery-level desserts at home might sound intimidating, but I promise you, this is a surprisingly simple process when you follow my exact blueprint. Here is why this recipe will become your new obsession:
- Unbelievably Easy: There is absolutely no baking required. If you can stir, spread, and use a freezer, you have all the technical skills needed to master this.
- The Best Texture Combination: You get the perfect contrast between creamy, slowly melting ice cream and the satisfying, crisp snap of the middle layer.
- A Crowd-Pleasing Classic: Nothing sparks joy and childhood memories quite like slicing into those distinct black-and-white layers.
- Total Quality Control: Making it yourself means you dictate the quality of the ingredients, ensuring a fresher, richer flavor profile than anything sitting in a grocery store freezer aisle.
Perfect for Hosting and Parties
When you are planning easy summer desserts for parties, you need something that can be prepared entirely in advance. This is where this dessert shines. Instead of stressing over warm ovens while your guests arrive, you simply pull this showstopper from the freezer. It is one of the most reliable copycat dessert recipes you can have in your hosting arsenal, allowing you to serve custom ice cream cakes tailored to your family’s exact preferences without paying premium bakery prices.
Ingredients You Need
Quality matters, even in fun, nostalgic recipes. Here is exactly what you need to build the perfect layers:
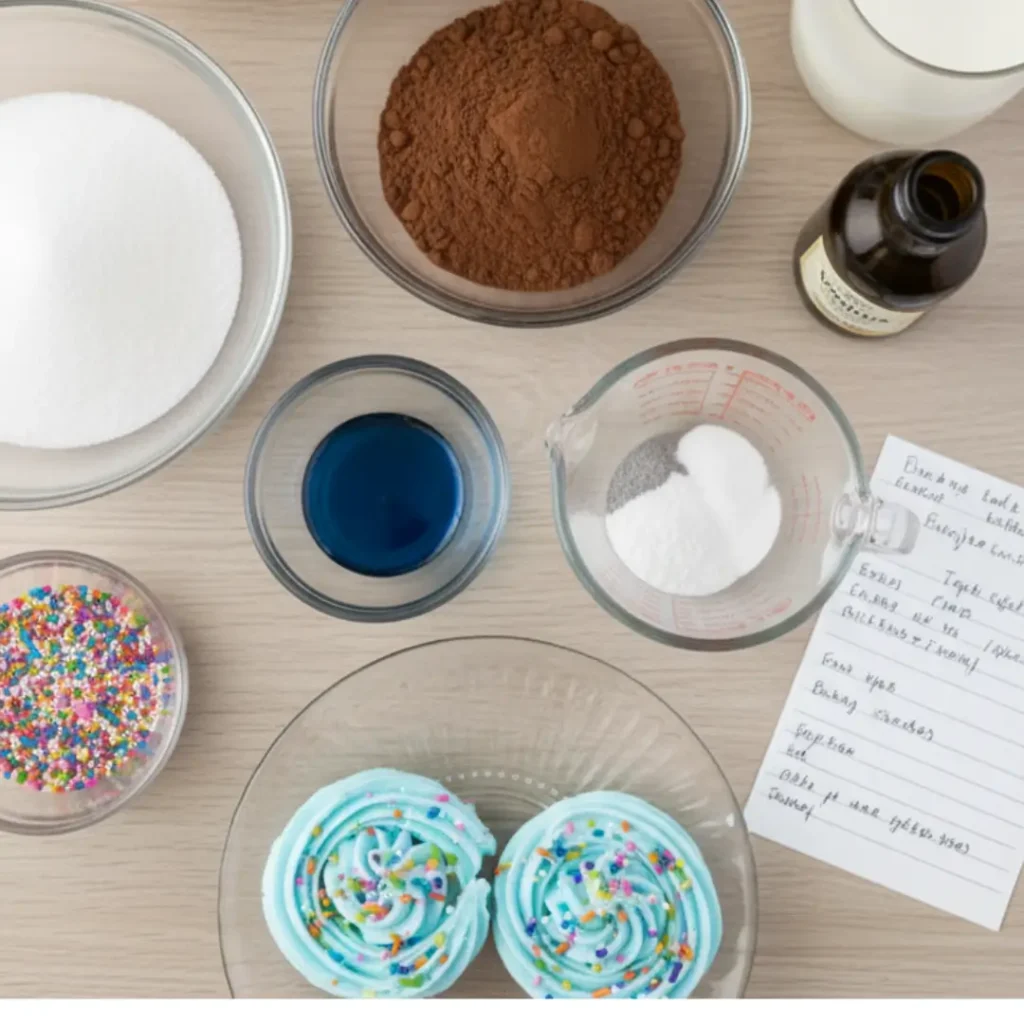
- 1.5 Quarts Chocolate Ice Cream: Choose a rich, full-fat variety. Allow it to soften on the counter for about 15-20 minutes until it reaches a spreadable, soft-serve consistency.
- 1.5 Quarts Vanilla Ice Cream: Opt for the best vanilla ice cream brands you can find at your local grocer. You want a distinct vanilla bean flavor to contrast the chocolate.
- 24 Chocolate Sandwich Cookies (like Oreos): These are the base for our crunchies. Do not remove the cream filling; it helps bind the crumble.
- 3/4 Cup Chocolate Magic Shell Coating: This is the chef’s secret weapon. It binds the cookie crumbs and creates that authentic, snappy texture.
- 1 Cup Premium Chocolate Fudge Sauce: Look for a thick, high-quality fudge that stays dense when cold.
- 1 Container (8 oz) Whipped Topping: Thawed. You can use stabilized homemade whipped cream, but classic whipped topping provides that authentic, slightly sweet bakery finish.
- Blue Gel Food Coloring (Optional): Just a drop to tint a portion of the whipped topping if you want to pipe on those classic bakery borders.
How to Make carvel ice cream cake
Step 1: Prep Your Springform Pan Line the bottom and sides of an 8-inch or 9-inch springform pan with parchment paper or clear acetate cake collars. Chef’s Tip: Pop the empty pan in the freezer for 15 minutes before you start. Working with a chilled vessel slows the melting process of your base layer.
Step 2: Build the Chocolate Foundation Take your softened chocolate ice cream and scoop it into the chilled pan. Use an offset spatula (run under hot water and wiped dry) to press the ice cream into an even, flat layer. You must eliminate all air pockets to ensure a beautiful slice later. Place the pan back into the freezer for at least 30 minutes to set firmly.
Step 3: Engineer the Iconic Crunchies While the base freezes, pulse your chocolate sandwich cookies in a food processor until they resemble coarse sand. Transfer to a bowl and pour in the chocolate magic shell coating. Toss with a fork until every single crumb is coated. This precise technique creates the authentic chocolate crunchies for cake that will not get soggy when sandwiched between wet ice cream.
Step 4: The Fudge and Crunch Layer Remove the pan from the freezer. Spread the premium chocolate fudge sauce evenly over the chocolate ice cream, leaving a tiny 1/4-inch border around the edge. Immediately pour your coated cookie crumbs over the fudge, pressing them down gently but firmly into an even layer. Freeze again for 45 minutes. This layer must be rock hard before the next step.
Step 5: Add the Vanilla Crown Once the crunch layer is frozen solid, add your softened vanilla ice cream. Spread it out quickly and smoothly with your offset spatula. If the vanilla is too hard, it will tear up your crumb layer, so ensure it is a true soft-serve texture. Freeze the entire cake for at least 4 hours, or ideally overnight, to let the structure solidify completely.
Step 6: Frost and Decorate Unclasp the springform pan and peel away the parchment. Quickly frost the entire exterior of the cake with your thawed whipped topping. It acts as an incredible insulator to keep the ice cream firm while serving. Pipe a decorative border around the top and bottom edges. Freeze for one final hour to set the frosting.
Expert Tips for Success
After building hundreds of these in commercial kitchens, here are the non-negotiable rules for a flawless execution:
- Respect the Freeze Times: Patience is your most important ingredient. Rushing the freezing process between layers is the number one reason for a messy, bleeding homemade ice cream cake recipe.
- The Hot Knife Trick: When it is time to serve, dip a sharp chef’s knife into a tall glass of hot water, wipe it completely dry with a towel, and make your cut. Repeat this hot-water-and-wipe process for every single slice to achieve those pristine, bakery-window edges.
- Whip It Right: If you substitute homemade whipped cream for the store-bought topping, you must stabilize it with a little gelatin or mascarpone cheese; otherwise, it will weep and slide off your frozen cake in the freezer.
- Do Not Over-soften: You want the ice cream soft enough to spread, but not liquid. If it melts completely, the ice crystals reform during the refreeze, resulting in a gritty, icy texture rather than a creamy one.
Frequently Asked Questions
How long does carvel ice cream cake stay fresh?
When stored properly in an airtight cake keeper or wrapped tightly in multiple layers of plastic wrap, your dessert will maintain optimal flavor and texture for up to two weeks in the freezer. After that, ice crystals may begin to form, compromising the creamy mouthfeel.
Can I make this ahead of time?
Absolutely, and you should! Because the freezing process takes several hours, this is the ultimate make-ahead dessert. I highly recommend assembling the entire cake (including frosting) one to two days before your event. Just leave it perfectly safe in the coldest part of your freezer until 10 minutes before you plan to slice it.
Conclusion
Creating this nostalgic masterpiece in your own kitchen is a deeply rewarding experience that will elevate you to hero status at your next gathering. With my professional techniques, you can skip the bakery lines and deliver an unforgettable dessert. I would love to hear how your creation turns out! Please leave a rating below, and drop a comment telling me about the reactions you received when you sliced into those perfect layers. Happy no-baking.
carvel ice cream cake
Ingredients
Method
- Line the bottom and sides of an 8-inch springform pan with parchment paper and chill in the freezer for 15 minutes.
- Spread the softened chocolate ice cream evenly into the bottom of the pan. Freeze for 30 minutes.
- Pulse the cookies in a food processor until coarse. Toss with the magic shell coating until fully saturated.
- Spread the fudge sauce over the chocolate ice cream layer, leaving a small border. Press the coated cookie crumbs firmly into the fudge. Freeze for 45 minutes.
- Spread the softened vanilla ice cream carefully over the frozen crumb layer. Freeze the entire cake for at least 4 hours or overnight.
- Remove from the springform pan, frost the outside with whipped topping, and pipe decorative borders. Freeze for 1 hour before slicing.