easy gluten free desserts are finally within your absolute control. For decades, home cooks have struggled with crumbly textures, grainy mouths, and complicated flour blends that simply do not deliver. In my 40 years as an elite culinary strategist and executive pastry chef, I have seen every baking disaster imaginable.
I have dedicated my career to reverse-engineering the world’s finest pastries so that you can replicate them effortlessly in your own kitchen. Today, I am giving you my closely guarded secret for a velvety, rich, no-bake chocolate tart that will completely redefine your standard for allergen-friendly baking. You do not need a culinary degree to make this masterpiece; you just need the right technique, which I am going to walk you through step-by-step.
Table of Contents
Why You Will Love This easy gluten free desserts Recipe
When you are preparing a menu, you need reliable recipes that deliver maximum impact with minimal stress. This tart is an absolute revelation for your recipe box.
- Easy and Approachable: You do not need to turn on your oven or worry about exact rising times. The chilling process does all the heavy lifting for you.
- Best In Class Flavor: By relying on high-quality ingredients rather than complex chemical leaveners, the pure, unadulterated flavor of the chocolate shines through brilliantly.
- Simple Ingredients: You will not find any mysterious gums or hard-to-source stabilizers here. Everything you need is likely already in your pantry or available at your local grocer.
- No-Bake Perfection: Perfect for hot summer days or busy holiday seasons when your oven space is completely monopolized by savory dishes.
Perfect for Hosting and Parties
When you are entertaining, navigating dietary restrictions can feel like walking a tightrope. This recipe eliminates that stress entirely. It stands proudly among top-tier celiac friendly desserts without tasting like a compromise. Because the crust utilizes naturally gluten-free nuts instead of complicated gluten free baking flour blends, it offers a beautifully rustic, nutty crunch that contrasts flawlessly with the silky filling.
If you have guests who are health-conscious, they will be thrilled to know this fits perfectly into the category of dairy free gluten free treats. Furthermore, the natural fats make it an incredibly satisfying option for those seeking low carb gluten free indulgences. Whether you are hosting an elegant dinner party or bringing a dish to a casual potluck, this tart is the ultimate gluten free party food. It looks like a million dollars, slices like an absolute dream, and satisfies the deepest chocolate cravings.
Ingredients You Need
To achieve professional-level results, ingredient quality is non-negotiable. Here is what you need to gather for your tart:

- Almond Flour: 2 cups, finely blanched. This is the cornerstone of the best almond flour desserts, providing a buttery, tender crumb without any graininess.
- Cocoa Powder: 1/4 cup, unsweetened Dutch-processed for a deep, dark color and smooth flavor.
- Coconut Oil: 1/2 cup, melted and slightly cooled. This acts as our binder for the crust.
- Maple Syrup: 1/4 cup for the crust, plus 2 tablespoons for the filling. Use 100% pure maple syrup, never imitation.
- Premium Gluten Free Chocolate: 12 ounces of high-quality dark chocolate (70% cacao or higher), chopped evenly. Always check the label to ensure it is processed in a safe facility.
- Coconut Cream: 1 cup, full-fat. Scoop only the thick cream from the top of a chilled can of coconut milk.
- Vanilla Extract: 1 tablespoon of pure extract to enhance the chocolate notes.
- Flaky Sea Salt: For garnishing. Do not skip this; salt magnifies the chocolate profile exponentially.
How to Make easy gluten free desserts
Understanding the why behind the steps is what separates amateur cooks from true chefs. Follow these instructions precisely, and you will achieve flawless results.
- Prepare the Tart Pan: Lightly grease a 9-inch tart pan with a removable bottom. This is crucial. A removable bottom ensures you can extract the delicate tart without cracking the crust, maintaining a flawless presentation.
- Mix the Crust: In a large mixing bowl, whisk together the blanched almond flour and Dutch-processed cocoa powder. Ensuring these dry ingredients are fully incorporated prevents bitter clumps of cocoa in your finished crust. Pour in the melted coconut oil and 1/4 cup of maple syrup. Stir with a silicone spatula until the mixture resembles wet sand.
- Press and Chill: Transfer the crust mixture into your prepared tart pan. Using the flat bottom of a measuring cup, press the mixture firmly and evenly into the bottom and up the sides of the pan. The compacting pressure is what binds the crust without baking. Place the pan in the freezer for 15 minutes to allow the coconut oil to solidify and set the foundation.
- Heat the Cream: In a small, heavy-bottomed saucepan, heat the coconut cream over medium-low heat until it just begins to simmer. Do not let it come to a rolling boil, or the fat may separate, ruining the texture of your ganache.
- Create the Emulsion: Place your evenly chopped premium gluten free chocolate in a heat-proof glass bowl. Pour the hot coconut cream directly over the chocolate. Let it sit completely undisturbed for exactly 5 minutes. This allows the residual heat to gently melt the cocoa butter. Add the remaining maple syrup and vanilla extract.
- Whisk to Perfection: Starting in the very center of the bowl, whisk in small, tight circles. As the mixture begins to emulsify and turn glossy, slowly widen your circles until the entire ganache is smooth, dark, and homogenous.
- Assemble and Set: Remove the firm crust from the freezer. Pour the warm, glossy ganache directly into the center of the crust, using an offset spatula to smooth it evenly to the edges.
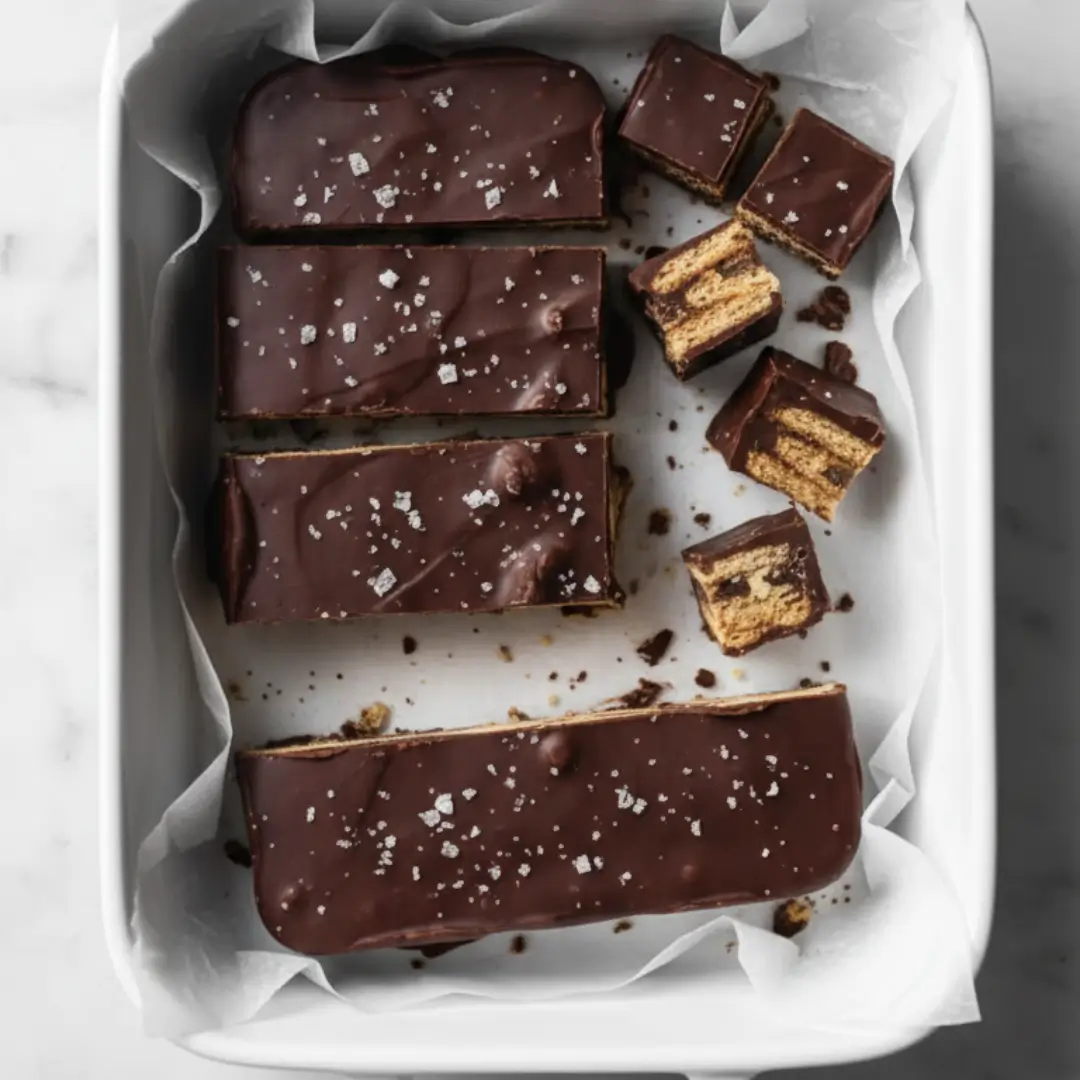
- The Final Chill: Refrigerate the tart for at least 4 hours, or ideally overnight. This slow chilling process allows the cocoa butter to crystallize properly, resulting in a sliceable, fudgy texture. Garnish with a generous sprinkle of flaky sea salt just before serving.
Expert Tips for Success
In my four decades in the kitchen, I have learned that the smallest details yield the biggest differences. Keep these chef secrets in mind:
- Temperature is Everything: When making your ganache, if your coconut cream is too hot, it will split the chocolate, leaving you with a greasy, grainy mess. If it happens, you can sometimes rescue it by vigorously whisking in a teaspoon of cold milk, but prevention is the best method. Keep it at a gentle simmer.
- Chop Your Chocolate Finely: Do not rely on chocolate chips. They contain stabilizers meant to hold their shape during baking, which prevents them from melting smoothly into a ganache. Buy high-quality bars and chop them finely and uniformly yourself.
- The Magic of Salt: Chocolate is inherently slightly bitter, and sugar is sweet. Salt bridges the gap between the two, waking up the palate and making the chocolate taste infinitely more complex. Never omit the finishing salt.
- Clean Slices: To get bakery-worthy, razor-sharp slices, run a long, thin chef’s knife under very hot water. Wipe the blade completely dry with a towel, then make your cut. Repeat the heating and wiping process for every single slice.
Frequently Asked Questions
How long does easy gluten free desserts stay fresh?
This tart has an exceptional shelf life due to the high fat content and lack of eggs or dairy. It will stay remarkably fresh, covered tightly in the refrigerator, for up to 5 days. In fact, many of my clients find that the flavors deepen and become even more pronounced on the second and third days as the vanilla and chocolate notes meld together.
Can I make this ahead of time?
Absolutely. Because this requires an extended chilling time to set properly, it is actually the perfect make-ahead dessert. You can prepare the entire tart up to 48 hours in advance of your event. Keep it wrapped tightly in plastic wrap in the refrigerator, and only add your flaky sea salt garnish right before you bring it to the table to ensure the salt crystals remain crunchy. You can also freeze the finished tart for up to a month; simply thaw it overnight in the refrigerator before serving.
Conclusion
Creating spectacular pastries does not require wheat flour; it requires passion, technique, and a refusal to compromise on quality. You now hold the blueprint to a dessert that will completely captivate anyone fortunate enough to sit at your table. Take your time, respect the ingredients, and watch as your guests take their first, unforgettable bite.
easy gluten free desserts
Ingredients
Method
- Lightly grease a 9-inch tart pan with a removable bottom.
- In a mixing bowl, whisk almond flour and cocoa powder. Stir in melted coconut oil and 1/4 cup maple syrup until the mixture resembles wet sand.
- Press the mixture firmly and evenly into the bottom and up the sides of the tart pan. Freeze for 15 minutes.
- In a small saucepan, heat the coconut cream over medium-low until it just begins to simmer. Do not boil.
- Place chopped chocolate in a heat-proof bowl. Pour hot cream over the chocolate and let sit completely undisturbed for 5 minutes.
- Add remaining 2 tablespoons of maple syrup and vanilla extract. Whisk starting in the center, widening circles until the ganache is smooth and glossy.
- Pour the ganache into the chilled crust and smooth with an offset spatula.
- Refrigerate for at least 4 hours to set. Garnish with flaky sea salt before slicing with a hot, clean knife.