janespatisserie brownies are the absolute pinnacle of chocolate indulgence, and after 40 years of running elite kitchens across the globe, I can confidently say this inspired technique will change your baking life. You have likely scoured the internet looking for that perfect, crinkly-topped, melt-in-your-mouth chocolate square.
As a culinary strategist, I have analyzed, tested, and perfected the ratios needed to achieve that flawless, fudgy center that bakery professionals charge a premium for. Whether you are baking for a high-end dinner party or simply satisfying a midnight craving, mastering this fundamental bake is essential for any home cook.
Table of Contents
Why You Will Love This janespatisserie brownies Approach
- The Ultimate Texture: We are avoiding cakey, dry disasters. This method guarantees a dense, rich, and incredibly moist crumb every single time.
- Incredibly Adaptable: Once you master this base, the sky is the limit. You can easily transform it into a cookie dough brownie by dropping chunks of safe-to-eat dough into the batter before baking.
- The Coveted Crinkle Top: I will teach you the exact science of whipping your eggs and sugar to achieve that gossamer, tissue-thin crust on top of your bake.
- Simple and Approachable: If you have been searching for a Jane’s Patisserie brownies recipe easy enough to tackle on a Tuesday night without a stand mixer, this step-by-step guide is exactly what you need.
Perfect for Hosting and Parties
When I design dessert menus for large-scale events, I always lean on high-quality chocolate bakes. They are universal crowd-pleasers. Fans of the acclaimed Jane’s patisserie blog know that a beautifully presented traybake is the ultimate party centerpiece. You can cut these into elegant, bite-sized petit fours or serve them in massive, rustic squares topped with vanilla bean gelato.
If you want to elevate your hosting game, you can customize this batter. Fold in caramel candies to replicate the famous Jane’s Patisserie Rolo brownies, or layer shortbread and caramel to create a show-stopping Brownie millionaire masterpiece. The robust structure of this recipe holds up to heavy mix-ins, meaning you can get creative without compromising the bake.
Ingredients You Need
To achieve professional-level results, you must start with exceptional ingredients. Here is what you need to gather:
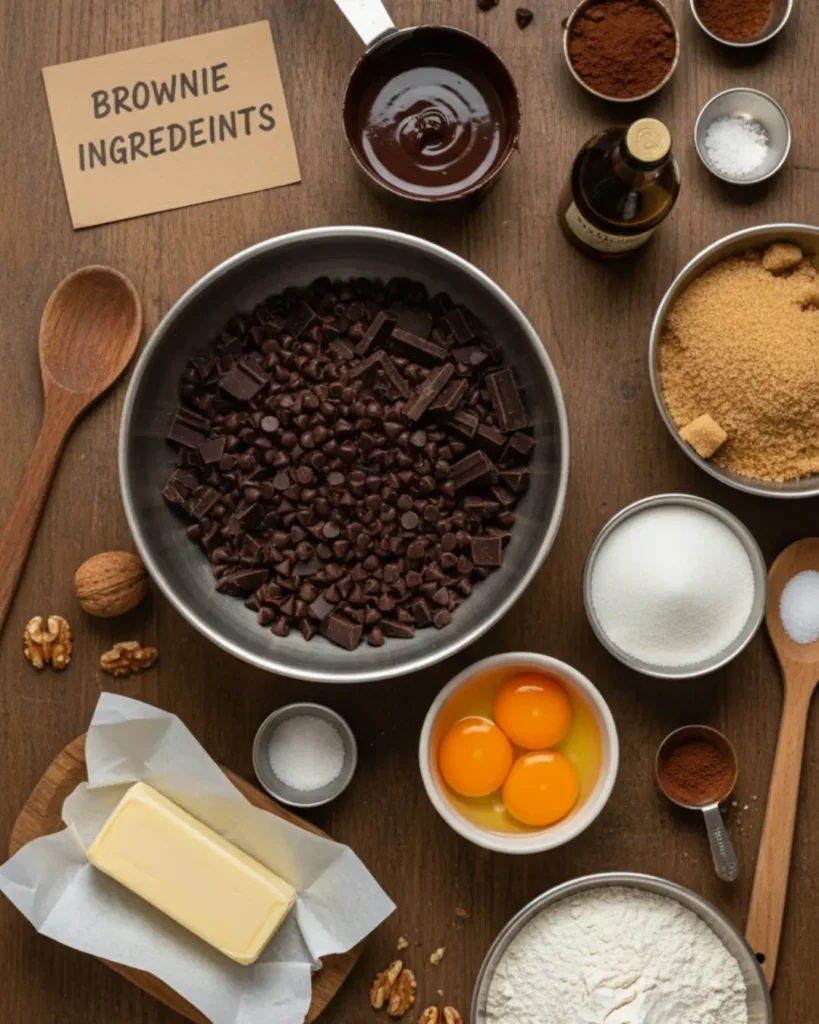
- Dark Chocolate (70% Cocoa): 200g. Do not use chocolate chips; use high-quality baking bars. The cocoa butter content is crucial for the texture.
- Unsalted Butter: 200g. European-style butter with a higher fat content will yield a richer flavor.
- Caster Sugar: 275g. The fine granules dissolve quickly into the eggs, ensuring a glossy top.
- Large Eggs: 3 whole eggs plus 1 egg yolk, at room temperature.
- Plain Flour (All-Purpose): 100g. We use very little flour to keep the result ultra-fudgy.
- Cocoa Powder: 50g. Dutch-processed cocoa powder adds a deep, dark color and an intense chocolate punch.
- Sea Salt: 1 teaspoon. A chef’s secret to balancing the intense sweetness.
How to Make janespatisserie brownies
- Prep and Preheat: Preheat your oven to 180°C (160°C Fan/350°F). Line an 8×8-inch square baking tin with high-quality parchment paper, leaving an overhang for easy removal.
- Melt the Chocolate and Butter: In a heatproof bowl set over a pan of gently simmering water (a bain-marie), melt the dark chocolate and unsalted butter together. Stir gently until completely smooth and glossy. Remove from the heat and let it cool slightly. Chef’s Tip: Never let the water touch the bottom of the bowl, or your chocolate will seize.
- Whip the Eggs and Sugar: In a large mixing bowl, combine the eggs, extra yolk, and caster sugar. Using an electric hand whisk, beat them together on medium-high speed for about 3 to 5 minutes. You are looking for the “ribbon stage” the mixture should be pale, thick, and leave a trailing ribbon when you lift the beaters. This is the secret to the crinkle top!
- Combine the Wet Ingredients: Gently pour the cooled, melted chocolate and butter mixture into the whipped eggs and sugar. Use a silicone spatula to fold the mixtures together carefully. Do not deflate the air you just whipped into the eggs.
- Sift and Fold the Dry Ingredients: Sift the plain flour, cocoa powder, and sea salt directly over the wet batter. Fold gently in a figure-eight motion until just combined. Stop mixing the second you no longer see streaks of dry flour.
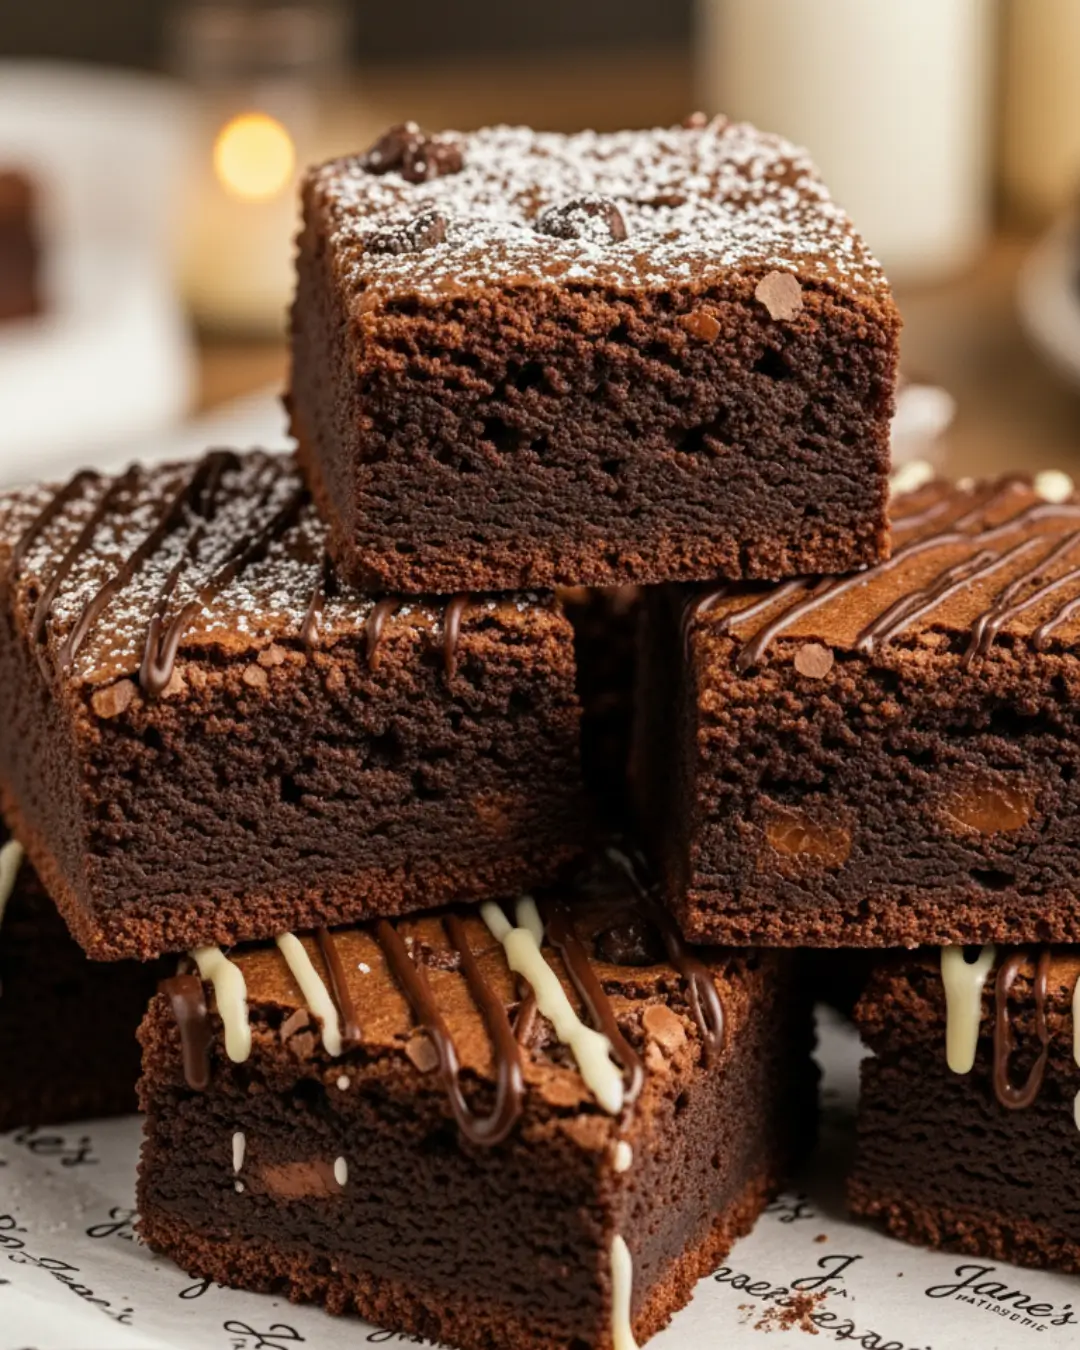
- Bake to Perfection: Pour the batter into your prepared tin and smooth the top. Bake on the middle rack for 25-30 minutes. The edges should look set, but the center should still have a slight wobble.
- The Crucial Chill: Remove from the oven and let them cool completely in the tin. For the absolute best texture, cover the tin and chill in the refrigerator overnight before slicing.
Expert Tips for Success
In my 40 years in the kitchen, I have seen every baking mistake possible. Follow these elite tips to ensure flawless execution:
- Respect the Ribbon Stage: Do not rush whipping the eggs and sugar. If you skip this, your bake will be flat and lack the beautiful, papery crust.
- Temperature Matters: Your eggs must be at room temperature to whip properly, and your melted chocolate must be cooled before adding it to the eggs so you do not accidentally scramble them.
- Underbake, Don’t Overbake: A toothpick inserted into the center should come out with sticky, moist crumbs, not clean liquid batter, but it should never come out completely clean. Residual heat will continue to cook them as they cool.
- Transform the Shape: If you prefer crispier edges, you can actually bake this exact batter in a muffin tin or scoop them to mimic the viral Jane’s patisserie brownie cookies. Just reduce the baking time to 12-14 minutes!
Frequently Asked Questions
How long do janespatisserie brownies stay fresh?
When stored in an airtight container at room temperature, they will stay incredibly moist and fresh for up to 5 days. You can also store them in the refrigerator for up to 7 days, which actually enhances their chewy, fudgy texture.
Can I make this ahead of time?
Absolutely. In professional kitchens, we almost always bake our chocolate squares a day in advance. Resting the bake allows the cocoa flavors to mature and makes them infinitely easier to slice into clean, razor-sharp squares. You can also freeze the baked, unsliced block tightly wrapped in plastic wrap and foil for up to 3 months.
Conclusion
Creating the ultimate chocolate dessert doesn’t require a culinary degree, just a commitment to proper technique and quality ingredients. By following these foundational steps inspired by the best bakers in the world, you will pull a tray of sheer perfection out of your oven every single time. Try experimenting with different mix-ins, like transforming them into a decadent cookie dough brownie or a rich Brownie millionaire, and make the recipe your own.
I would love to hear how your baking session went! Leave a rating, drop a comment below with your favorite flavor additions, and share this recipe with the chocolate lovers in your life.
janespatisserie brownies
Ingredients
Method
- Preheat oven to 180°C (160°C Fan/350°F). Line an 8×8-inch square baking tin with parchment paper.
- Melt the dark chocolate and butter together in a heatproof bowl set over a pan of simmering water. Stir until smooth, then set aside to cool slightly.
- In a large bowl, whisk the eggs, egg yolk, and caster sugar together for 3-5 minutes until thick, pale, and leaving a trailing ribbon.
- Gently fold the cooled melted chocolate mixture into the whipped eggs using a spatula.
- Sift the flour, cocoa powder, and salt over the wet mixture. Fold gently until just combined and no dry flour remains.
- Pour batter into the prepared tin. Bake for 25-30 minutes until the edges are set but the center has a slight wobble.
- Allow to cool completely in the tin, then chill in the fridge before slicing for the best fudgy texture.