By Chef Luna | 40 Years Culinary Experience
Let’s be honest: Red Velvet gets all the attention, but Pink Velvet Whoopie Pies are the fun, flirty cousin that steals the show. If you are looking for a dessert that screams “romance” without requiring a degree in pastry arts, you have arrived at the right place.
I’ve spent four decades in professional kitchens, and I’ve seen trends come and go. But the Whoopie Pie? It’s timeless. It’s not quite a cookie, not quite a cake it’s the best of both worlds. For this recipe, we are ditching the dry boxed mixes. I’m going to teach you how to make these from scratch to get that signature “velvet” texture—dense enough to hold a filling, but soft enough to melt in your mouth.
Whether you’re baking for a Galentine’s brunch, a classroom party, or a romantic night in, these heart-shaped beauties are your new secret weapon.
Table of Contents
Why You’ll Love This Pink Velvet Whoopie Pies
- 100% From Scratch: No chemical aftertaste from boxed mixes. We use real buttermilk and vinegar for that authentic tender crumb.
- Visual Showstopper: I’ll show you exactly how to pipe these into adorable hearts that look professionally made.
- The Perfect Balance: The tang of the cream cheese filling cuts perfectly through the sweetness of the pink velvet shell.
- Make-Ahead Friendly: These actually taste better the next day after the filling has had time to soften the cake slightly.
Ingredients Needed For Pink Velvet Whoopie Pies
The secret to the “Velvet” texture isn’t just the color it’s the chemistry between the acid (buttermilk/vinegar) and the baking soda.
- Dry Ingredients:
- All-Purpose Flour: Provides the structure.
- Cornstarch: My secret weapon. Replacing a tablespoon of flour with cornstarch lowers the protein content slightly, mimicking cake flour for a softer bite.
- Baking Soda & Salt: The lift and the flavor enhancer.
- Cocoa Powder (Optional): Just 1 teaspoon if you want that traditional “velvet” hint of chocolate, but you can omit it for a pure vanilla flavor.
- Wet Ingredients:
- Unsalted Butter: Softened to room temperature.
- Vegetable Oil: A splash of oil keeps these moist longer than butter alone.
- Granulated Sugar: For sweetness and spreading.
- Egg: Room temperature creates a better emulsion.
- Buttermilk: Essential for tenderness.
- White Vinegar: Reacts with the soda for extra fluffiness.
- Vanilla Extract: Use the good stuff!
- Pink Gel Food Coloring: Gel is crucial here—liquid adds too much water and can ruin the batter consistency.
- The Filling:
- Cream Cheese: Block style, not tub.
- Butter: Softened.
- Powdered Sugar: Sifted to remove lumps.
- Vanilla Bean Paste: For those lovely little speckles (optional, extract works too).
How to Make Pink Velvet Whoopie Pies
Step 1: Prep the Oven and Pans
Preheat your oven to 375°F (190°C). Line two large baking sheets with parchment paper. Do not use foil, or the bottoms will brown too quickly.
Step 2: Mix the Dry Ingredients
In a medium bowl, whisk together the flour, cornstarch, baking soda, salt, and cocoa powder (if using). Sifting is recommended here to ensure a lump-free batter.
Step 3: Cream the Butter and Sugar
In a stand mixer fitted with the paddle attachment, beat the butter, oil, and sugar on medium-high speed for 3-4 minutes. Why? You want this mixture to be pale and fluffy. This aeration is key to the cookie’s lift. Add the egg, vanilla, and vinegar, beating until combined.
Step 4: Alternate Wet and Dry
Reduce mixer speed to low. Add half the flour mixture, then the buttermilk, then the remaining flour. Mix just until the flour streaks disappear. Chef Luna’s Tip: Over-mixing develops gluten, which leads to tough, rubbery whoopie pies. Stop as soon as it’s combined!
Step 5: Color and Pipe
Fold in your pink gel coloring until you reach your desired shade. Transfer the batter to a piping bag fitted with a large round tip (like an Ateco 806).
- For Rounds: Pipe 1.5-inch circles spaced 2 inches apart.
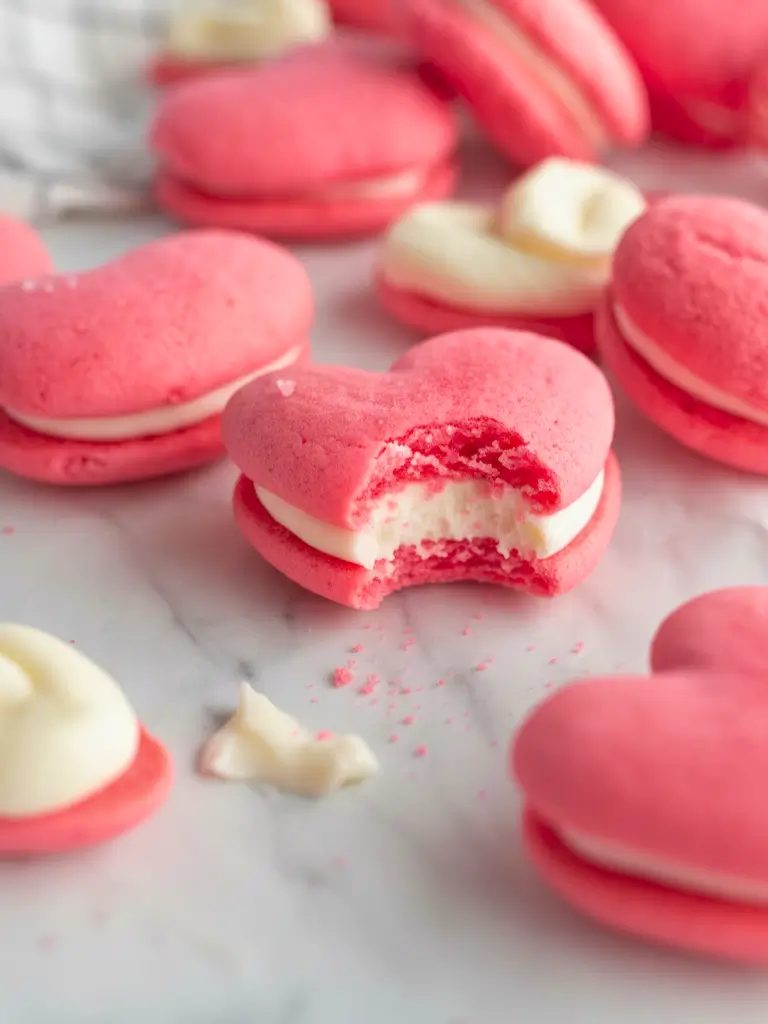
- For Hearts: Pipe a “V” shape. Squeeze a dollop for the left top of the heart, pull down to the center. Then squeeze a dollop for the right top and pull down to meet the first line at the bottom point. (See the user image for reference!)
Step 6: Bake and Cool
Bake for 9-11 minutes. They are done when the tops spring back when lightly touched. Let them cool on the pan for 5 minutes before moving to a wire rack. They must be completely cool before filling.
Step 7: The Filling
Beat the butter and cream cheese until smooth. Slowly add powdered sugar and vanilla. Beat on high for 2 minutes until fluffy. Pipe onto the flat side of one cookie and sandwich with another.
Expert Tips for Success Pink Velvet Whoopie Pies
- The “Tack” Test: How do you know they are done? Gently touch the top of a cookie. If it feels sticky or wet, it needs another minute. If it feels dry and springs back, pull them out immediately.
- Piping Consistency: If your batter is too runny to hold a heart shape, chill it in the fridge for 15-20 minutes before piping.
- Matchmaking: Before filling, lay all your baked cookies out and pair them up by size and shape. This ensures every sandwich looks uniform.
- Gel vs. Liquid: I cannot stress this enough—use Gel Paste coloring (like Americolor Soft Pink). Liquid food coloring adds water, which can cause the cookies to spread too thin and lose their shape.
Serving and Storage Tips
- Storage: Because of the cream cheese filling, these should be stored in the refrigerator. They will keep fresh for up to 5 days in an airtight container.
- Serving: Serve at room temperature! Cold whoopie pies are dense. Take them out of the fridge 30 minutes before eating to let the buttercream soften and the cake relax.
- Freezing: You can freeze the baked (unfilled) cookies for up to 3 months. Or, freeze the assembled pies individually wrapped in plastic wrap. Thaw on the counter for an hour.
Frequently Asked Questions
Q: Can I use marshmallow fluff instead of cream cheese? A: Absolutely! For a classic New England style, beat 1 cup unsalted butter with 1 cup powdered sugar and 1 jar (7oz) of marshmallow fluff. It’s sweeter than the cream cheese version but very traditional.
Q: Why did my whoopie pies go flat? A: This usually happens if the butter was too warm (melted) when you started, or if the oven wasn’t fully preheated. Make sure your butter is soft but not greasy.
Q: Can I make the batter ahead of time? A: I don’t recommend it. The baking soda and vinegar start reacting immediately. You want to get that reaction into the oven quickly for the best rise.
Conclusion
These Pink Velvet Whoopie Pies are more than just a dessert; they are a little edible gesture of love. Soft, tangy, sweet, and undeniably cute, they are destined to become a Valentine’s Day tradition in your home.
Did you try piping the hearts? Let me know how it went in the comments below! And don’t forget to rate the recipe 5 stars if you loved it!
Pink Velvet Whoopie Pies
Ingredients
Method
- Preheat oven to 375°F (190°C). Line two large baking sheets with parchment paper.
- In a medium bowl, whisk together flour, cornstarch, baking soda, salt, and cocoa powder (if using). Set aside.
- In a large bowl or stand mixer, cream the butter and sugar on medium-high speed until light and fluffy (about 3 minutes). Beat in the egg, vanilla, and vinegar.
- Reduce speed to low. Add half the flour mixture, followed by the buttermilk, and then the remaining flour mixture. Mix just until combined. Do not overmix.
- Fold in the pink gel food coloring until you reach your desired color.
- Transfer batter to a piping bag with a large round tip. Pipe 1.5-inch circles or V-shapes (for hearts) onto the prepared pans, spacing them 2 inches apart.
- Bake for 9-11 minutes, or until the tops spring back when lightly touched. Allow to cool completely on the pan or a wire rack.
- Make the filling: Beat cream cheese and butter until smooth. Gradually add powdered sugar and vanilla, beating until fluffy.
- Pipe filling onto the flat side of half the cookies and sandwich with the remaining halves. Enjoy!