By Chef Luna
Hello, darlings! If there is one dessert that screams “celebration,” it is this Red Velvet Swirl Cheesecake.
In my 40 years of professional baking, I’ve seen many trends come and go, but the marriage of slight cocoa bitterness with rich, tangy cream cheese is a love affair that never fades. Whether you are baking for a romantic Valentine’s dinner, a Christmas feast, or simply because you deserve a slice of luxury on a Tuesday, this Red Velvet Cheesecake Recipe is your answer.
Many home bakers are intimidated by cheesecakes fear of the water bath, fear of cracks, or fear of a “muddy” swirl. Put those fears aside. I’m going to hold your hand through this process, sharing my specific techniques to ensure your cheesecake comes out as smooth as silk and visually striking. Let’s get baking!
Table of Contents
Why You’ll Love This Cheesecake Factory Red Velvet Cheesecake Copycat
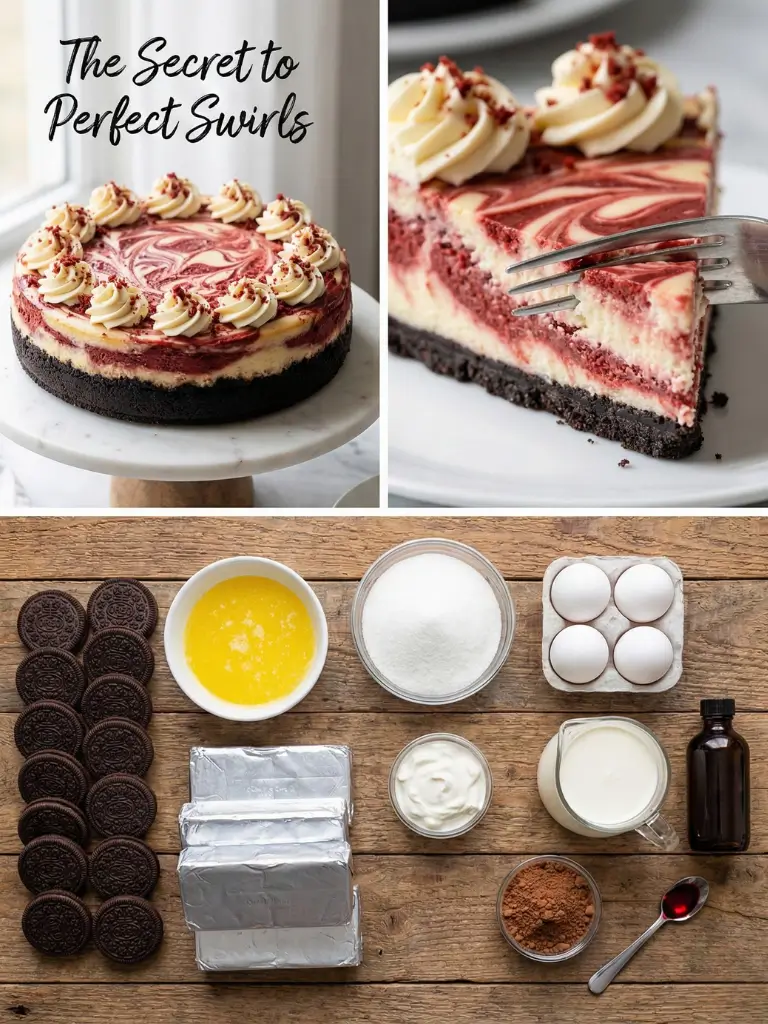
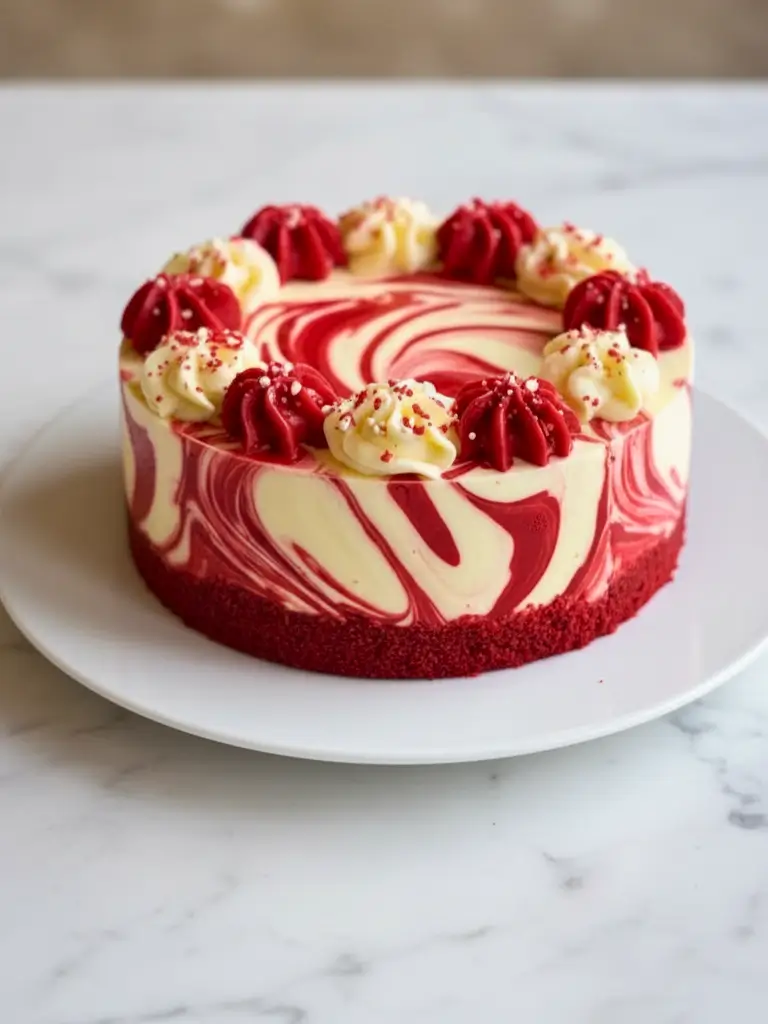
- Visually Stunning: The vibrant red and creamy white marble effect makes this a showstopper centerpiece.
- Texture Perfection: It features a dense, fudgy red velvet crust (or cake base) topped with an ultra-creamy, velvety filling.
- Best of Both Worlds: You get the classic taste of red velvet cake combined with the richness of a New York-style cheesecake.
- Freezer Friendly: This cake actually tastes better after settling, making it the perfect make-ahead dessert for busy holidays.
Ingredients Needed For Best Red Velvet Cheesecake Recipe
For the best results, precision is key. Do not substitute low-fat ingredients here; cheesecake relies on fat for structure and mouthfeel.
The Red Velvet Crust
- Oreo Cookies (24 cookies): Whole cookies, including the cream filling. This provides a stable, chocolaty base.
- Unsalted Butter (5 tbsp): Melted.
The Cheesecake Filling
- Cream Cheese (32 oz / 4 blocks): Crucial: Must be softened to room temperature. If it’s cold, you will get lumps.
- Granulated Sugar (1 ⅓ cups): White sugar helps avoid overpowering the tanginess.
- Sour Cream (½ cup): Room temperature. This adds that signature cheesecake tang and softens the texture.
- Heavy Cream (⅓ cup): Room temperature.
- Vanilla Extract (1 tbsp): High quality matters here.
- Eggs (4 large): Room temperature.
The Red Velvet Swirl
- Cocoa Powder (3 tbsp): Unsweetened.
- Red Gel Food Coloring (1-2 tsp): Do not use liquid drops; they will water down the batter. Gel is potent and vibrant.
How to Make Red Velvet Swirl Cheesecake
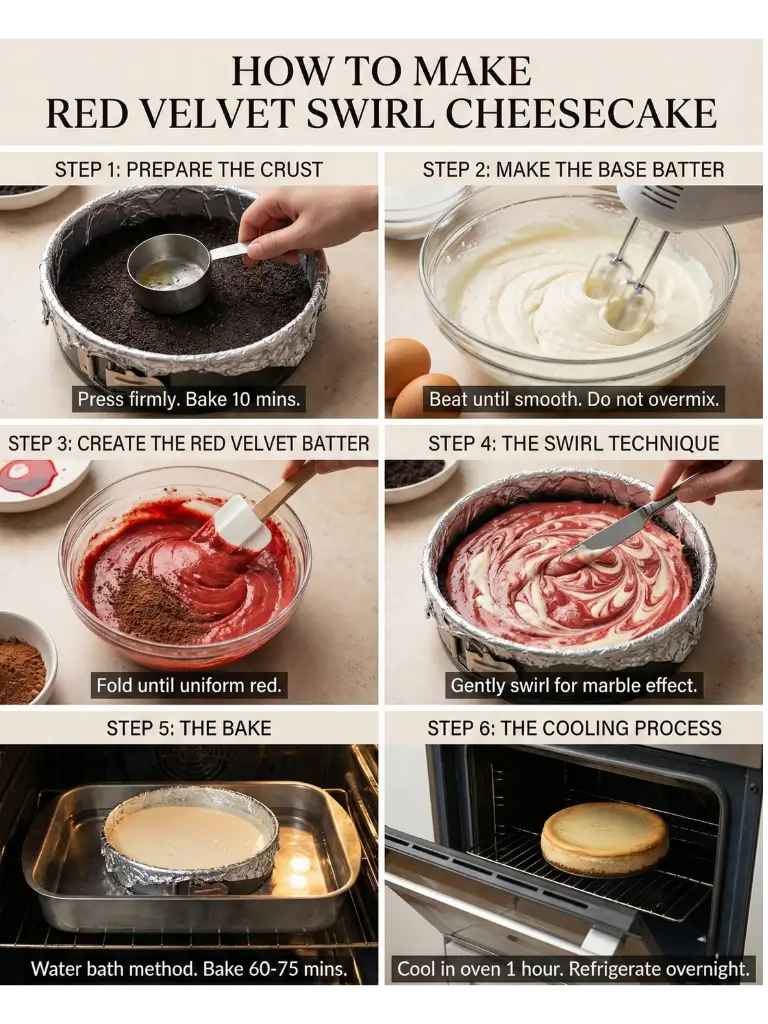
Step 1: Prepare the Crust
Preheat your oven to 350°F (175°C). Wrap the bottom of a 9-inch springform pan in aluminum foil (to protect against leaks).
- Pulse the Oreos in a food processor until fine crumbs form.
- Mix with melted butter until it resembles wet sand.
- Press firmly into the bottom of the pan. Chef’s Tip: Use the bottom of a measuring cup to pack it down tight. Bake for 10 minutes. Set aside to cool.
Step 2: Make the Base Batter
- Reduce oven temperature to 325°F (160°C).
- In a large bowl (or stand mixer with a paddle attachment), beat the cream cheese and sugar on medium-low speed until completely smooth. Do not whip air into it.
- Add the sour cream, heavy cream, and vanilla. Mix until combined.
- Add eggs one at a time, mixing just until the yellow disappears. Stop mixing immediately after the last egg. Overbeating eggs causes cheesecakes to crack.
Step 3: Create the Red Velvet Batter
- Remove about 1 ½ to 2 cups of the plain cheesecake batter and place it into a separate medium bowl.
- Sift the cocoa powder into this smaller bowl. Add the red gel food coloring.
- Gently fold until the color is a uniform, vibrant red.
Step 4: The Swirl Technique
- Pour half of the Red Batter onto the crust.
- Pour half of the White Batter over the red.
- Repeat with remaining batters, dropping spoonfuls randomly.
- Take a butter knife or skewer and gently swirl through the batters to create a marble effect. Don’t over-swirl, or you’ll get pink mud!
Step 5: The Bake
- Place the springform pan inside a larger roasting pan. Fill the roasting pan with hot water until it reaches 1 inch up the side of the cheesecake pan (Water Bath Method).
- Bake for 60–75 minutes.
- The Jiggle Test: The center should still jiggle slightly like Jell-O, but the edges should be set.
Step 6: The Cooling Process (Don’t Skip!)
- Turn off the oven. Crack the oven door open slightly and leave the cheesecake inside for 1 hour. This gradual cooling prevents thermal shock (cracks).
- Remove and let cool completely on the counter.
- Refrigerate for at least 6 hours (preferably overnight) before slicing.
Expert Tips for Success
- Room Temperature Ingredients: I cannot stress this enough. If your cream cheese or eggs are cold, they won’t emulsify properly, leading to a lumpy texture. Take them out of the fridge 2 hours before baking.
- The Water Bath: Yes, it’s annoying, but it guarantees a silky texture and keeps the top flat and white (no browning). Wrap your pan in a slow-cooker liner or multiple layers of heavy-duty foil to ensure no water seeps in.
- Clean Slices: To get those sharp, professional slices shown in the photo, run a sharp chef’s knife under hot water, wipe it dry, and slice. Repeat for every single cut.
Serving and Storage Tips
- Garnish: As seen in the photo, pipe rosettes of whipped cream or cream cheese frosting around the border and sprinkle with festive sprinkles or red velvet crumbs.
- Storage: Keep covered in the refrigerator for up to 5 days.
- Freezing: This cake freezes beautifully. Wrap the whole cake (or slices) in plastic wrap, then foil. Freeze for up to 2 months. Thaw in the fridge overnight.
Frequently Asked Questions
Q: Can I make this without a water bath? A: You can, but the texture will be slightly denser, like a New York cheesecake, and the top might crack. If you skip the bath, bake at a slightly lower temp (300°F) for a longer time.
Q: Why did my red velvet swirl turn brown? A: This usually happens if you use “Dutch Processed” cocoa powder, which reacts differently with acids. Use regular unsweetened cocoa powder for the best red hue.
Q: Can I use a graham cracker crust instead? A: Absolutely! However, the chocolate Oreo crust provides a classic “Red Velvet” flavor profile that pairs best with the filling.
Conclusion
This Red Velvet Swirl Cheesecake is more than just a dessert; it is a labor of love that rewards you with every creamy, tangy, chocolatey bite. It is the kind of recipe that builds your reputation as the best baker in the family.
I’d love to hear from you! Did you try the swirl technique? Did you manage to keep the cracks away? Leave a comment below and rate the recipe—it helps other bakers find us!
Bon Appétit, darlings! – Chef Luna
Ultimate Red Velvet Swirl Cheesecake
Ingredients
Method
- Preheat oven to 350°F (175°C). Prepare a 9-inch springform pan by wrapping the bottom in heavy-duty foil.
- Make Crust: Pulse Oreos into fine crumbs. Mix with melted butter. Press firmly into the bottom of the pan. Bake for 10 minutes. Set aside to cool.
- Reduce oven to 325°F (160°C). In a large mixer, beat cream cheese and sugar on medium-low speed until completely smooth.
- Add sour cream, heavy cream, and vanilla. Mix until combined. Add eggs one at a time, mixing just until incorporated. Do not overmix.
- Create Swirl: Transfer 1.5 to 2 cups of batter to a separate bowl. Sift in cocoa powder and add red food coloring. Fold until uniform.
- Pour batters into the crust, alternating spoonfuls of red and white. Gently swirl with a knife to create a marble effect.
- Place springform pan into a roasting pan filled with 1 inch of hot water. Bake for 60-75 minutes until edges are set but center jiggles slightly.
- Turn off oven and crack door open. Let cool inside for 1 hour. Remove and refrigerate for 6+ hours before slicing.


Beautiful 🙏🏼🙌🏼