Royal icing cookies are the kind of treat that turns a simple baking day into something memorable. They’re crisp on the edges, tender in the center, and topped with a smooth, glossy icing that dries beautifully. Whether you’re making holiday shapes, birthday themes, or simple circles with cute patterns, these cookies look polished without being fussy.
The best part? You can make them ahead, decorate at your own pace, and they keep well. If you’ve been curious about royal icing but felt intimidated, this guide will make it feel simple and doable.
Table of Contents
What Makes This Royal icing cookies So Good
- Clean, sturdy edges: The cookie dough holds its shape as it bakes, so stars look like stars and hearts stay sharp.
- Soft bite, not rock hard: The cookies are slightly tender inside, which balances the crisp icing on top.
- Glossy royal icing finish: The icing dries smooth and shiny, perfect for writing, flooding, and details.
- Beginner-friendly method: Clear steps for getting the right icing consistency without guesswork.
- Make-ahead friendly: Both the dough and icing can be prepped ahead, making decorating day stress-free.
What You’ll Need
- For the sugar cookies:
- 2 3/4 cups all-purpose flour, plus extra for dusting
- 1/2 teaspoon baking powder
- 1/2 teaspoon fine salt
- 1 cup unsalted butter, softened
- 3/4 cup granulated sugar
- 1 large egg
- 2 teaspoons vanilla extract (or 1 teaspoon vanilla + 1/2 teaspoon almond extract)
- For the royal icing:
- 4 cups powdered sugar, sifted
- 3 tablespoons meringue powder (or 2 large pasteurized egg whites)
- 6–8 tablespoons water, plus more as needed
- 1 teaspoon vanilla or almond extract (optional, use clear extract to keep colors bright)
- Gel food coloring (various colors)
- Tools:
- Mixing bowls and electric mixer
- Rolling pin and cookie cutters
- Baking sheets lined with parchment
- Piping bags or squeeze bottles
- Piping tips (small round tips like #1–#3)
- Toothpicks or scribe tool
- Cooling racks
How to Make It

- Cream the butter and sugar: In a large bowl, beat butter and sugar on medium speed until light and fluffy, about 2–3 minutes.
Add the egg and extract(s). Mix until smooth.
- Combine dry ingredients: In a separate bowl, whisk flour, baking powder, and salt. Add to the butter mixture in two additions, mixing on low just until combined.
The dough should hold together without being sticky.
- Chill the dough: Divide dough into two discs, wrap, and chill for 45–60 minutes. This helps prevent spreading and makes rolling easier.
- Roll and cut: Preheat oven to 350°F (175°C). On a lightly floured surface, roll dough to about 1/4 inch thick.
Cut shapes and place them on parchment-lined sheets about 1 inch apart.
- Bake: Bake 9–12 minutes, depending on size. Edges should look set and barely golden. Let cookies rest on the sheet for 5 minutes, then cool completely on racks.
- Make the royal icing: In a bowl, mix powdered sugar and meringue powder.
Add 6 tablespoons water and the extract, then beat on medium until thick and glossy, 2–3 minutes. Add water 1 teaspoon at a time until it reaches a piping consistency (about like toothpaste).
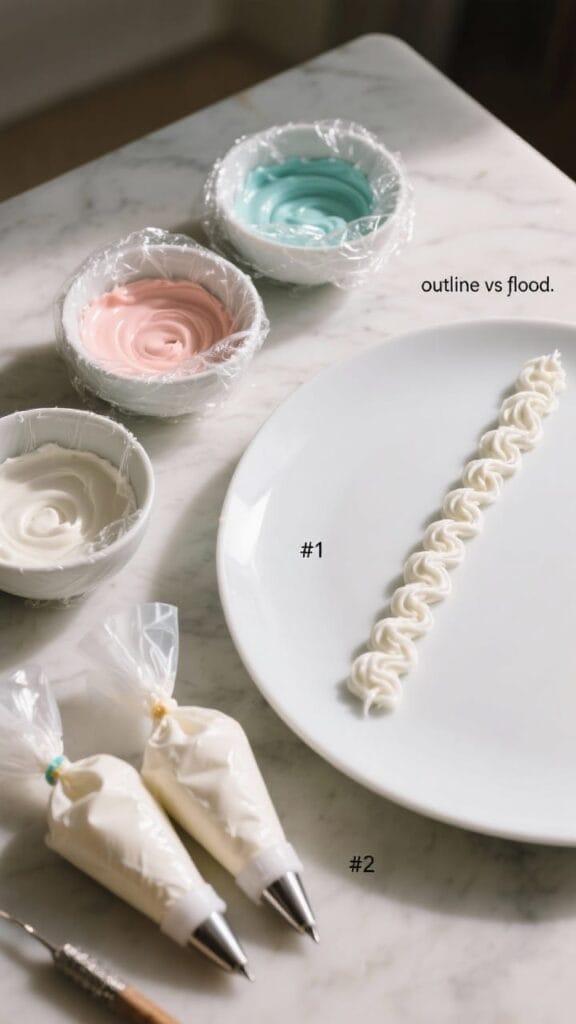
- Divide and color: Split icing into bowls. Color with gel food coloring, a drop at a time.
Cover each bowl with plastic wrap touching the surface to prevent crusting.
- Adjust consistencies:
- Outline icing: Keep a small portion thick for clean edges.
- Flood icing: Thinning with water to a honey-like flow that settles in 10–15 seconds. Add water a few drops at a time.
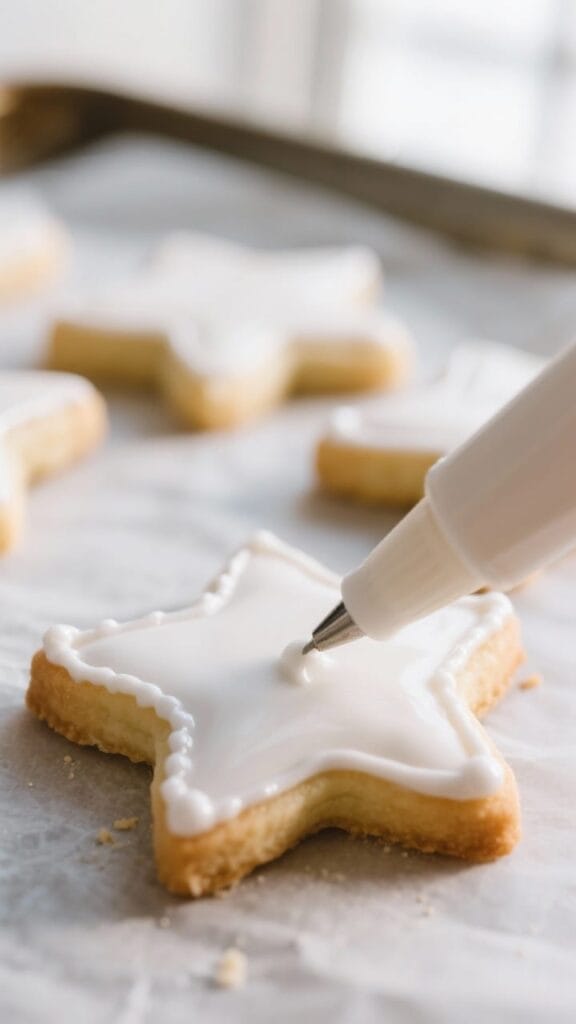
- Decorate: Pipe outlines with thick icing and let them set for a few minutes. Fill the centers with flood icing, using a toothpick to nudge icing into corners and pop air bubbles.
- Dry: Let cookies dry uncovered at room temperature until the surface is set, 6–8 hours or overnight.
For layered details, dry the base for at least 1–2 hours before adding more decoration.
Keeping It Fresh
- Storing undecorated cookies: Keep in an airtight container at room temperature for up to 5 days, or freeze for up to 2 months. Thaw at room temperature in the container to prevent condensation.
- Storing decorated cookies: Once fully dry, layer between parchment in an airtight container. They keep well at room temperature for 1–2 weeks.
- Royal icing storage: Store in airtight containers for up to 1 week at room temperature or 2 weeks in the fridge.
Stir well before using. If too thick, add a few drops of water.
- Avoid humidity: Moist air softens icing. If your kitchen is humid, run a fan near the drying cookies or use a dehumidifier.
Health Benefits
- Portion control: Cookies are naturally small, which makes it easier to enjoy a treat without overdoing it.
- Lower in fat than frosted cakes: These cookies use less frosting per serving than a typical slice of cake, keeping overall fat and calories modest.
- Customizable ingredients: You can use high-quality butter, pure extracts, and even reduce sugar slightly in the dough while maintaining structure.
- Allergy-friendly options: With simple swaps, you can make them gluten-free or dairy-free for specific needs.
Common Mistakes to Avoid
- Skipping the chill: Warm dough spreads and loses shape.
Chilling is key for clean edges.
- Overmixing the dough: This leads to tough cookies. Stop mixing once the flour is incorporated.
- Wrong icing consistency: If it’s too thick, it won’t settle; too thin, it floods over the edges. Test on a plate and adjust slowly with water or more sugar.
- Not letting layers dry: Adding details too soon causes colors to bleed.
Give each layer time to set.
- Baking too dark: Overbaked cookies become hard and dry. Pull them when edges are just set.
Variations You Can Try
- Lemon sugar cookies: Add 1 tablespoon lemon zest to the dough and swap half the vanilla for lemon extract.
- Spiced winter cookies: Add 1 teaspoon cinnamon and a pinch of nutmeg to the dry ingredients.
- Almond confetti: Use almond extract in both dough and icing, then decorate with nonpareils while the icing is wet.
- Chocolate cookies: Replace 1/3 cup flour with cocoa powder for a rich cocoa base.
- Gluten-free: Use a 1:1 gluten-free baking flour with xanthan gum. Chill well, and roll gently.
- Dairy-free: Use plant-based butter sticks and check that your meringue powder is dairy-free.
FAQ
Can I use egg whites instead of meringue powder?
Yes.
Use 2 large pasteurized egg whites and reduce the water slightly. Beat with the powdered sugar until glossy, then thin with water as needed. Pasteurized whites are important for food safety.
How long does royal icing take to dry?
Plan on 6–8 hours for a full set at room temperature, or overnight for best results.
Thin layers dry faster, while thick details take longer. Avoid stacking until the icing is completely firm.
Why is my icing dull instead of shiny?
Too much air in the icing, high humidity, or overmixing can reduce shine. Mix on low once it’s combined, don’t whip excessively, and let cookies dry in a dry, undisturbed area.
What’s the easiest way to get smooth floods?
Use a consistent flood icing that settles in about 10–15 seconds.
Outline first, then flood. Use a toothpick or scribe tool to push icing to the edges and pop bubbles right away.
Can I freeze decorated cookies?
Yes, once fully dry. Layer with parchment in an airtight container and freeze up to 2 months.
Thaw in the closed container at room temperature to prevent condensation from marring the icing.
How do I prevent color bleeding?
Let base layers dry before adding details, avoid overly thin icing, and keep colors on the thicker side for small details. Dry in a cool, low-humidity space.
What tip size should I use?
Small round tips like #2 are great for outlining and flooding, while #1 is ideal for fine details. You can also skip tips and use small piping bags with a tiny snip at the end.
Can I reduce the sweetness?
You can decrease sugar in the cookie dough by 2–3 tablespoons without affecting structure.
For icing, sweetness is part of the texture, but you can use a thinner layer and more cookie showing through.
Final Thoughts
Royal icing cookies are a satisfying blend of craft and comfort. The cookie base is simple and reliable, and the icing turns each one into a mini canvas. With a little practice on consistency and drying times, your cookies will look clean and professional.
Keep a few colors on hand, let your designs be playful, and enjoy the process as much as the finished batch.


Royal Icing Cookies – Crisp, Colorful, and Perfect for Decorating
Ingredients
Method
- Cream the butter and sugar: In a large bowl, beat butter and sugar on medium speed until light and fluffy, about 2–3 minutes.Add the egg and extract(s). Mix until smooth.
- Combine dry ingredients: In a separate bowl, whisk flour, baking powder, and salt. Add to the butter mixture in two additions, mixing on low just until combined.The dough should hold together without being sticky.
- Chill the dough: Divide dough into two discs, wrap, and chill for 45–60 minutes. This helps prevent spreading and makes rolling easier.
- Roll and cut: Preheat oven to 350°F (175°C). On a lightly floured surface, roll dough to about 1/4 inch thick.Cut shapes and place them on parchment-lined sheets about 1 inch apart.
- Bake: Bake 9–12 minutes, depending on size. Edges should look set and barely golden. Let cookies rest on the sheet for 5 minutes, then cool completely on racks.
- Make the royal icing: In a bowl, mix powdered sugar and meringue powder.Add 6 tablespoons water and the extract, then beat on medium until thick and glossy, 2–3 minutes. Add water 1 teaspoon at a time until it reaches a piping consistency (about like toothpaste).
- Divide and color: Split icing into bowls. Color with gel food coloring, a drop at a time.Cover each bowl with plastic wrap touching the surface to prevent crusting.
- Adjust consistencies: Outline icing: Keep a small portion thick for clean edges.
- Flood icing: Thinning with water to a honey-like flow that settles in 10–15 seconds. Add water a few drops at a time.
- Decorate: Pipe outlines with thick icing and let them set for a few minutes. Fill the centers with flood icing, using a toothpick to nudge icing into corners and pop air bubbles.
- Dry: Let cookies dry uncovered at room temperature until the surface is set, 6–8 hours or overnight.For layered details, dry the base for at least 1–2 hours before adding more decoration.
Related posts:
 Cut Out Sugar Cookies With Cream Cheese Frosting – Soft, Simple, and Festive
 Royal Icing Christmas Cookies – Classic, Festive, and Fun to Decorate
 Royal Icing Christmas Cookies Ideas – Festive, Fun, and Easy to Decorate
 Best Sugar Cookie Recipe for Decorating Royal Icing – Soft, Sturdy, and Delicious