The ultimate mint brownies are exactly what your dessert repertoire needs to go from wonderfully ordinary to utterly unforgettable. Over my 40 years as a culinary strategist and executive chef, I have developed countless pastries and confections, but the marriage of deep, dark chocolate and refreshing cool peppermint remains an undisputed champion of flavor profiles.
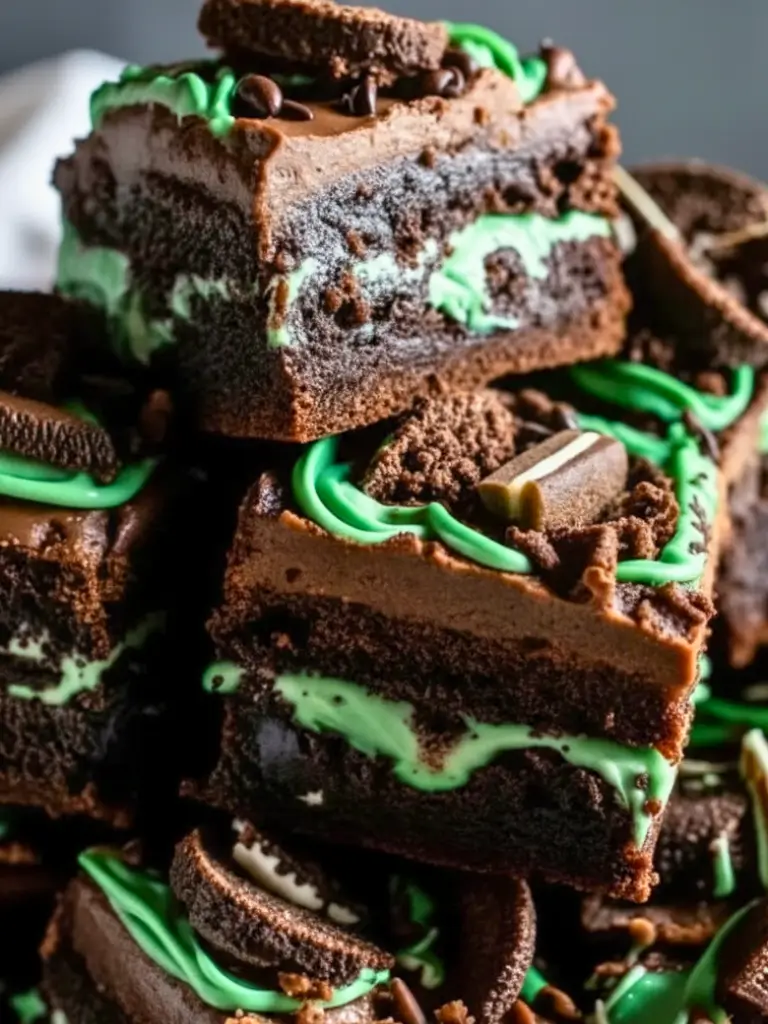
When you sink your teeth into these decadent squares, you first break through a snappy, glossy chocolate ganache, sink into a pillowy cloud of vibrant mint buttercream, and finally arrive at an intensely fudgy, dense brownie base. It is a multisensory experience that commands attention and leaves your guests begging for the recipe.
Why You’ll Love This Loaded ultimate mint brownies
If you are a fan of the classic combination of rich dark chocolate and refreshing peppermint, this is the dessert of your dreams. These aren’t just brownies; they are a triple-layered indulgence that looks as incredible as it tastes.
Table of Contents
- Texture Heaven: We start with a dense, fudgy brownie base (no cakey brownies here!), followed by a creamy, whipped mint buttercream, and finished with a silky chocolate ganache.
- Nostalgic Flavor: The flavor profile mimics your favorite Andes Mints or thin mint cookies but elevated into a gourmet dessert bar.
- Showstopper Appearance: The vibrant green layer against the dark chocolate makes these perfect for St. Patrick’s Day, Christmas, or any occasion that needs a pop of color.
- Totally “Loaded”: We don’t skimp on toppings. Chopped mint chocolates, sprinkles, and a drizzle of extra chocolate make these truly “ultimate.”
Ingredients
For the Fudgy Brownie Base
- Unsalted Butter: Melted, to provide that dense, chewy texture.
- Granulated Sugar: Sweetens the cocoa and creates a crackly top.
- Cocoa Powder: Use high-quality Dutch-processed cocoa for a darker color and smoother flavor.
- Eggs: Room temperature eggs bind the batter.
- Vanilla Extract: Enhances the chocolate flavor.
- All-Purpose Flour: Just enough to hold it together; too much creates a cakey texture.
- Salt: Essential to balance the sweetness.
For the Mint Buttercream Layer
- Unsalted Butter: Softened to room temperature for fluffy beating.
- Powdered Sugar: Creates a smooth, melt-in-your-mouth frosting.
- Peppermint Extract: Be sure to use peppermint, not spearmint (which tastes like toothpaste).
- Heavy Cream: To thin the frosting to the perfect spreading consistency.
- Green Gel Food Coloring: Gel is preferred over liquid to maintain consistency while achieving a vibrant hue.
For the Ganache & Toppings
- Semi-Sweet Chocolate Chips: Or a chopped chocolate bar.
- Heavy Whipping Cream: Heated to melt the chocolate into a glossy ganache.
- Andes Mints: Chopped roughly.
- Mint Chips or Sprinkles: For that final festive touch.
Instructions
1. Prepare the Brownie Base
Preheat your oven to 350°F (175°C). Line a 9×9 inch baking pan with parchment paper, leaving an overhang on the sides for easy lifting. In a large bowl, whisk the melted butter and sugar until combined. Beat in the eggs and vanilla. Fold in the flour, cocoa powder, and salt until just combined. Do not overmix.
2. Bake and Cool Completely
Pour the batter into the prepared pan and smooth the top. Bake for 25-30 minutes, or until a toothpick comes out with a few moist crumbs (not wet batter). Crucial Step: Let the brownies cool completely in the pan. If they are even slightly warm, the mint layer will melt.
3. Make the Mint Buttercream
In a stand mixer or using a hand mixer, beat the softened butter until pale and creamy (about 3 minutes). Gradually add the powdered sugar, heavy cream, and peppermint extract. Beat on high until fluffy. Add a small drop of green gel food coloring and mix until you reach your desired shade of mint green.
4. Layer the Mint
Spread the mint buttercream evenly over the fully cooled brownie base. Place the pan in the refrigerator for 20-30 minutes to let the butter layer firm up. This ensures the warm ganache doesn’t melt the mint layer when poured.
5. Prepare the Ganache
Place the chocolate chips in a heat-proof bowl. Microwave the heavy cream until it just begins to simmer (do not boil over). Pour the hot cream over the chocolate chips. Let it sit for 3 minutes, then gently whisk from the center outwards until smooth and glossy.
6. Serve
Pour the ganache over the chilled mint layer and spread quickly. Immediately sprinkle with chopped Andes mints, mint chips, and sprinkles before the chocolate sets. Chill for at least 1 hour to set. Lift out using the parchment paper, slice into squares, and serve.
Expert Tips for Success
- The “Clean Cut” Trick: To get those perfect, sharp layers visible in the photos, run a sharp chef’s knife under hot water, wipe it dry, and then make a cut. Wipe the knife clean and reheat between every single cut.
- Don’t Overbake: Fudgy brownies should be slightly underdone in the center when you take them out. They will firm up as they cool.
- Gel vs. Liquid Color: Use gel food coloring. Liquid food coloring can add too much moisture to your buttercream, making it separate or runny.
- Chilling is Key: Do not rush the chilling steps. The distinct layers rely on the different temperatures to stay separate.

Variations
- Boozy Mint: Substitute half of the heavy cream in the ganache with Crème de Menthe liqueur for an adult version.
- The “Oreo” Mint: Crush mint Oreo cookies and fold them into the brownie batter before baking for added crunch.
- White Chocolate Ganache: Use white chocolate chips for the topping and swirl in green coloring for a different aesthetic.
Frequently Asked Questions (ultimate mint brownies)
Can I freeze these brownies? Yes! These freeze beautifully. Wrap the whole block or individual squares tightly in plastic wrap and then foil. Freeze for up to 3 months. Thaw in the fridge overnight.
Why did my mint layer melt? The brownie base was likely too warm when you applied the buttercream, or the ganache was too hot. Ensure the base is room temp (or chilled) and chill the mint layer before adding the warm ganache.
Can I use fresh mint? Fresh mint leaves are great for garnish, but for the filling, extract provides the concentrated flavor needed to cut through the rich chocolate.
The Ultimate Loaded Mint Brownies
Ingredients
Method
- Preheat your oven to 350°F (175°C). Line a 9×9 inch baking pan with parchment paper, leaving an overhang on the sides for easy removal.
- Make the Brownie: In a large mixing bowl, whisk together the melted butter and granulated sugar until well combined. Add the eggs and vanilla extract, beating vigorously until the mixture is glossy.
- Sift in the cocoa powder, flour, and salt. Gently fold the dry ingredients into the wet mixture until just combined and no flour streaks remain. Pour batter into the prepared pan.
- Bake for 25-30 minutes, or until a toothpick inserted into the center comes out with a few moist crumbs. Remove from oven and let cool completely in the pan.
- Make the Mint Layer: In a stand mixer, beat the softened butter until creamy. Gradually add powdered sugar, 2 tablespoons of heavy cream, and peppermint extract. Beat on high until fluffy. Add green food coloring until desired shade is reached.
- Spread the mint buttercream evenly over the cooled brownies. Place the pan in the fridge for 20 minutes to firm up.
- Make the Ganache: Place chocolate chips in a heatproof bowl. Microwave the 1/2 cup heavy cream until it begins to simmer (about 45 seconds). Pour hot cream over chocolate chips. Let sit for 3 minutes, then whisk until smooth and glossy.
- Pour ganache over the chilled mint layer and spread quickly. Immediately top with chopped Andes mints. Chill the entire pan for at least 1 hour to set before slicing.