Lucky Charms Fudge is the magical, melt-in-your-mouth confection that will instantly transport you back to your favorite childhood Saturday mornings. Welcome to my kitchen. I am Chef Luna, and over my 40 years as a culinary strategist and executive pastry chef, I have plated everything from intricate sugar sculptures to five-star petit fours. Yet, time and time again, I find that the most profound culinary joy comes from elevating simple, beloved classics.
This recipe perfectly balances the nostalgic crunch of those iconic, colorful marshmallows with a velvety, rich base that practically dissolves on your tongue. Forget the gritty, crystallized fudges of the past; today, I am teaching you the professional techniques required to achieve a flawlessly smooth emulsion every single time.
Why You’ll Love This Lucky Charms Fudge
If you are looking for the ultimate St. Patrick’s Day treat or just a whimsical dessert to brighten up a gloomy Tuesday, this Lucky Charms Fudge is pure magic. It combines the nostalgic, sugary crunch of everyone’s favorite cereal marshmallows with the creamy, decadent texture of white chocolate fudge.
Table of Contents
Here is why this recipe is about to become a staple in your kitchen:
- No Candy Thermometer Needed: unlike traditional fudge that requires precise boiling points and softball stages, this recipe uses the foolproof “quick fudge” method.
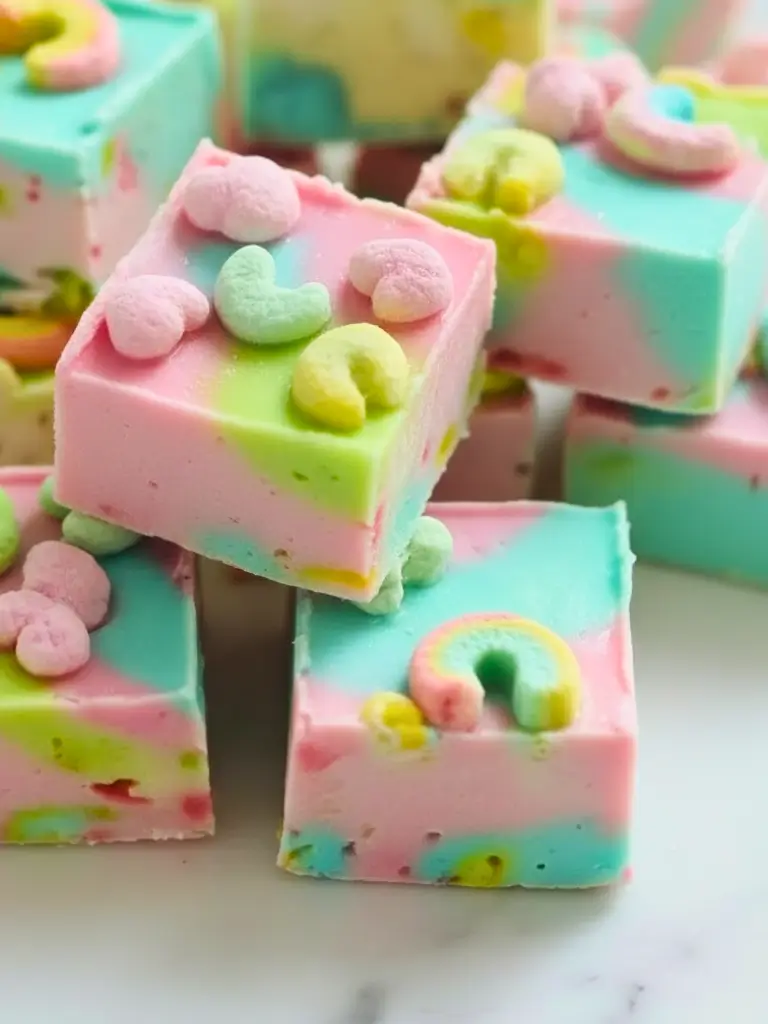
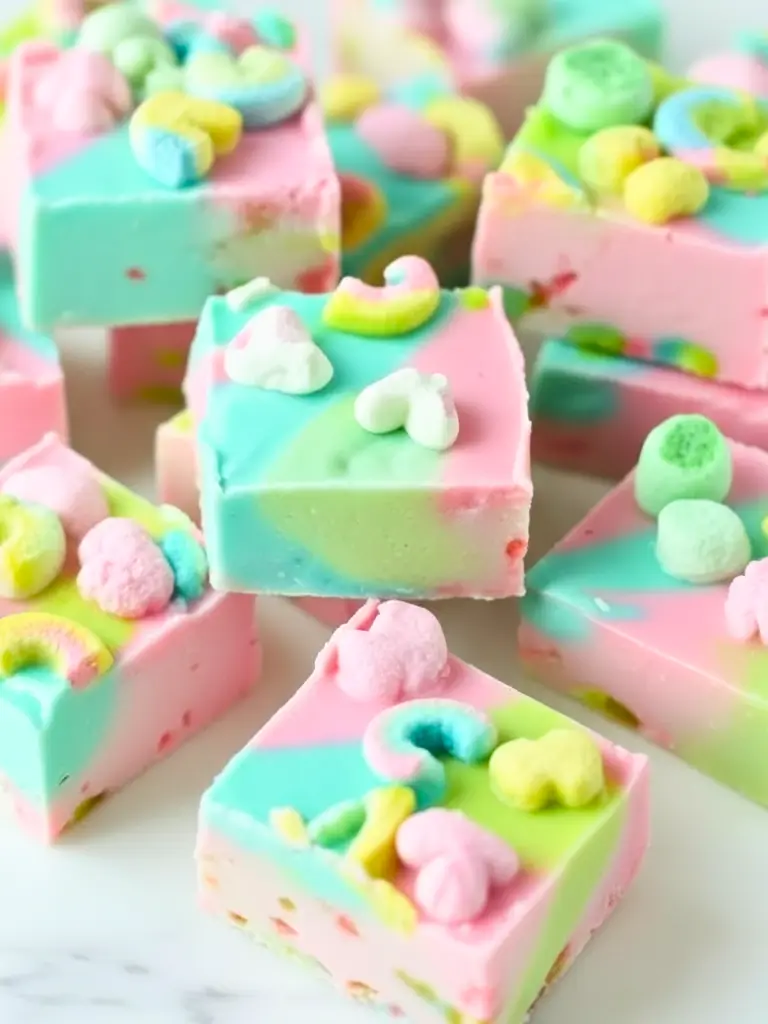
- Visually Stunning: The pastel swirls of pink, blue, and green make this look like it came straight from a boutique bakery. It is totally Instagram-worthy.
- Customizable: While we are using Lucky Charms for that pot-of-gold vibe, the base recipe is a blank canvas for any flavor or color palette.
- Kid-Friendly: This is the perfect recipe to get little hands involved. They can help separate the marshmallows from the cereal (the best job ever) and sprinkle the toppings.
Whether you are hosting a party or just need a sweet pick-me-up, this creamy, dreamy rainbow fudge delivers big flavor with minimal effort.
Ingredients
To achieve that ultra-creamy texture and vibrant color without seizing the chocolate, specific ingredients are key.
The Fudge Base
- White Chocolate Chips: You will need about 3 cups. High-quality chips (like Ghirardelli or Guittard) melt much smoother than generic store brands, which can sometimes result in a grainy texture.
- Sweetened Condensed Milk: One 14-ounce can. Do not confuse this with evaporated milk; they are not interchangeable. This provides the sugar and the creamy structure for the fudge.
- Vanilla Extract: Use clear vanilla extract if you want to keep the white parts of the fudge purely white, though regular pure vanilla extract adds a better depth of flavor.
- Salt: A pinch of fine sea salt is essential to cut through the intense sweetness of the white chocolate and condensed milk.
The Magic Add-Ins
- Lucky Charms Marshmallows: You will need about 1 cup of just the marshmallows. You can buy bags of “just marshmallows” online, or have fun sorting through a box of cereal.
- Gel Food Coloring: It is crucial to use gel food coloring (pink, blue, and green/teal). Liquid food coloring contains water, which can cause melting chocolate to “seize” and become lumpy instantly. Gel is potent and fat-friendly.
Instructions
Making this fudge is all about timing. Have your pans prepped and bowls ready before you start melting the chocolate.
1. Prepare the Pan
Line an 8×8 or 9×9 inch square baking pan with parchment paper. Make sure to leave an overhang of paper on the sides this creates a “sling” that allows you to easily lift the entire block of fudge out once it has set. Spray the paper lightly with non-stick cooking spray.
2. Create the Mixture
In a large microwave-safe bowl (or a double boiler if you prefer), combine the white chocolate chips and the sweetened condensed milk. Microwave in 30-second intervals, stirring vigorously between each burst. Repeat until the mixture is completely smooth and glossy. Stir in the vanilla extract and salt.
3. Divide and Color
Work quickly as the fudge will start to set as it cools. Divide the white fudge mixture evenly into three or four small bowls (depending on how many colors you want). Keep one bowl white if desired. Add a very small drop of gel food coloring to the other bowls—one pink, one blue, and one green. Stir well until the colors are uniform.
4. The Swirl Technique
Drop spoonfuls of the different colored fudge randomly into the prepared pan. Do not spread them out yet; just create a patchwork of alternating colored dollops. Once all the mixture is in the pan, take a butter knife or a skewer and gently swirl through the batter in a figure-eight motion. Do not over-mix, or you will end up with a muddy gray color instead of defined swirls.
5. Add the Charms
Immediately gently press the Lucky Charms marshmallows onto the top of the fudge. Press them down slightly so they stick well to the surface but aren’t fully submerged. You want those rainbows and shooting stars to be visible!
6. Serve (Lucky Charms Fudge)
Place the pan in the refrigerator and let it chill for at least 2 to 4 hours, or until completely firm. Once set, lift the fudge out using the parchment paper handles. Place on a cutting board and slice into 1-inch squares.
Expert Tips for Success
- Avoid Seizing: Water is the enemy of melting chocolate. Ensure your bowls and spoons are completely dry before starting. If your chocolate becomes hard and grainy, it has seized.
- Clean Cuts: To get those sharp, bakery-style edges shown in the photos, dip a sharp chef’s knife into hot water, wipe it dry, and then make a cut. Clean the knife between every single slice.
- Don’t Overheat: If you microwave the chocolate too long, it can scorch. Once the chips are mostly melted, just stir—the residual heat will melt the remaining bits.
- Marshmallow Freshness: Ensure your marshmallows are fresh and crunchy. Stale cereal marshmallows can become chewy in an unpleasant way when exposed to the moisture of the fudge.
Variations
- Golden Grahams Crust: For a “s’mores” twist, crush Golden Grahams cereal with melted butter and press it into the bottom of the pan before adding the fudge mixture.
- Flavor Extracts: Switch up the flavor profile! A drop of almond extract pairs beautifully with white chocolate, or use cotton candy flavoring for a carnival vibe.
- Holiday Editions: Swap the pastel colors for Red and Green during Christmas, or Orange and Black for Halloween, using seasonal sprinkles or marshmallows.
Frequently Asked Questions
Can I freeze this fudge? Yes! Wrap the fudge block tightly in plastic wrap, then foil, and freeze for up to 3 months. Thaw in the fridge overnight before cutting.
Why is my fudge too soft? If the fudge doesn’t set after 4 hours, it’s possible the chocolate ratio was too low compared to the condensed milk, or it wasn’t chilled long enough. White chocolate fudge is naturally softer than dark chocolate fudge, so keep it in the fridge until serving time.
Can I use white chocolate baking bars instead of chips? Absolutely. Baking bars (like Baker’s or Lindt) actually melt even better than chips because they contain more cocoa butter. Just chop them finely before melting.
3-Ingredient Lucky Charms Fudge
Ingredients
Method
- Line an 8×8 or 9×9 inch square baking pan with parchment paper, leaving an overhang on the sides for easy removal. Spray lightly with non-stick spray.
- In a large microwave-safe bowl, combine the white chocolate chips and sweetened condensed milk.
- Microwave in 30-second intervals, stirring vigorously in between, until the mixture is completely melted, smooth, and glossy. Do not overheat.
- Stir in the vanilla extract and the pinch of salt.
- Working quickly, divide the mixture into 3 or 4 small bowls. Tint each bowl a different pastel color using a small amount of gel food coloring (Pink, Blue, Green, and keep one White if desired).
- Drop spoonfuls of the different colored mixtures randomly into the prepared pan. Use a knife to gently swirl the colors together to create a marble effect. Do not over-mix.
- Immediately press the Lucky Charms marshmallows onto the top of the soft fudge.
- Refrigerate for at least 4 hours until firm. Remove from pan using the parchment paper overhang and slice into squares.
Notes
Slicing Tip: For clean cuts, run your knife under hot water and wipe dry between slices.