strawberry chocolate cake is the absolute pinnacle of confectionery indulgence, marrying the deep complexity of rich chocolate with the bright, juicy tang of summer berries. After extensive experience of testing recipes in my kitchen, I can tell you that getting the perfect balance between structural density and moist crumb requires precise ingredient selection and technique. This guide will walk you through creating a bakery-quality showstopper right in your home kitchen.
The first time I made a chocolate strawberry cake, I realized how easily a fruit-filled layer cake could turn into a soggy, unstable mess if the filling wasn’t structured properly. After countless rounds of testing throughout my career, I discovered that creating a dedicated frosting barrier ring combined with a concentrated homemade jam base is the secret to flawless architectural integrity. This ensures that every single slice stays upright, beautiful, and pristine on the dessert plate.
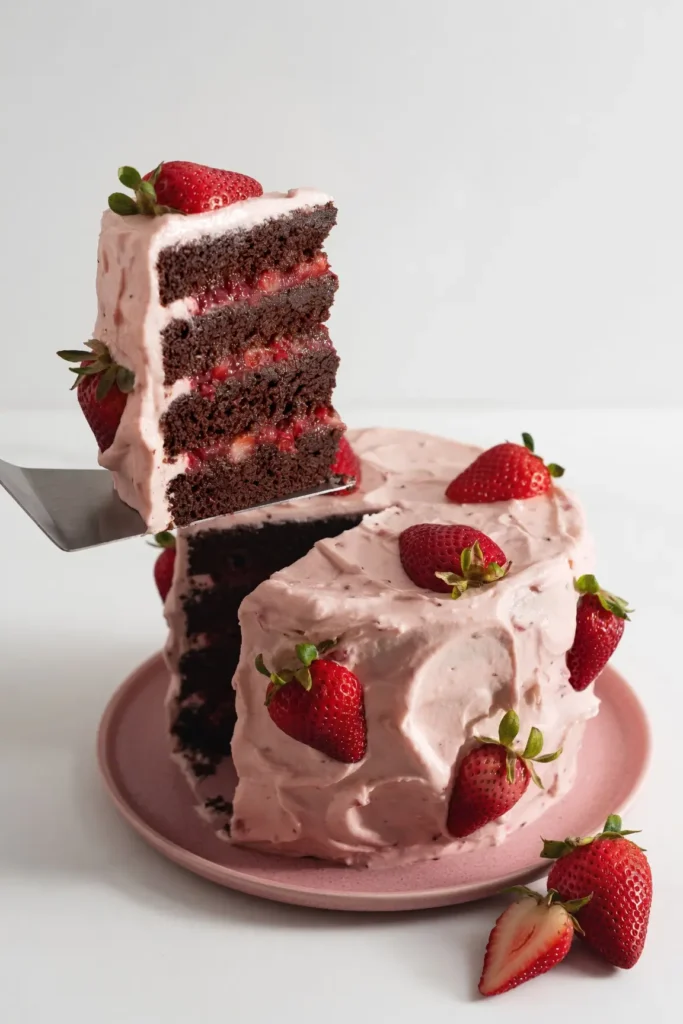
What separates this chocolate strawberry cake from the rest is its incredible multi-textured approach. Instead of relying solely on artificial flavorings, we construct a genuine strawberry cream cheese frosting infused with real reduced fruit jam, complemented by layers of deeply rich fudgy chocolate cake. Every component works in harmony: the tanginess of the cream cheese cuts right through the sweet notes of the berry filling, while the bitterness of the chocolate grounds the entire profile.
This strawberry chocolate cake will not disappoint. Let’s get started on mastering this exceptional dessert.
Table of Contents
Essential Tools for Strawberry Chocolate Cake Assembly
Achieving a professional-looking finish requires a few fundamental tools that elevate your home baking execution.
- Two 6-inch Round Cake Pans: Scaled perfectly for thick, towering layers.
- Kitchen Scale: Crucial for measuring your dry ingredients accurately; baking by weight avoids dry, over-packed flour.
- Electric Hand Mixer: Essential for beating the fats and sugars to maximum creaminess for the frosting.
- Piping Bag: Used to construct a perimeter wall of frosting that retains the jam.
- Offset Spatula: Provides ergonomic control when smoothing out the delicate cream cheese layers.
- Cake Scraper or Bench Knife: Yields those pristine, clean sides during the final coating phase.
The Science of Ingredients For Strawberry Chocolate Cake
Every element in this recipe serves a distinct chemical purpose. For the cake base, we utilize natural cocoa powder. It is imperative to remember that natural cocoa retains its natural acidity, which reactively activates the baking soda to produce a beautiful rise. Do not substitute Dutch-processed cocoa powder here, as its neutralized pH will leave your batter flat and dense.
We combine both melted unsalted butter and light-tasting vegetable oil (such as canola or avocado oil). While butter imparts that classic, undeniable rich flavor, oil remains liquid at room temperature, ensuring the crumb stays extraordinarily moist and soft even after chilling in the refrigerator.
Master Ingredients List
Homemade Strawberry Jam Base
- 50g Strawberries (fresh or frozen)
- 50g Granulated sugar
- 1 tbsp Water
Rich Fudgy Chocolate Sponge
- 190g All-purpose flour
- 75g Natural cocoa powder
- 1 tsp Baking powder
- ½ tsp Baking soda
- ½ tsp Fine sea salt
- 115g Unsalted butter, melted and cooled slightly
- 100g Light-tasting vegetable oil
- 100g Granulated white sugar
- 100g Packed light brown sugar
- 2 Large eggs (must be at room temperature)
- 330g Whole milk (must be at room temperature)
Structural Strawberry Cream Cheese Frosting
- 250g Full-fat block cream cheese (softened)
- 115g Unsalted butter (softened to room temperature)
- 100g Powdered sugar
- 70g Prepared strawberry jam (cooled completely from the base step above)
- 1 tsp Pure vanilla extract
Fruit Filling & Topping Decorations
- 200g Fresh strawberries, meticulously washed, dried, and finely diced
- 7 Whole fresh strawberries, cut in half for the top crown decoration
Step-by-Step Baking and Assembly Guide
1. Reducing the Fruit Jam Compote
In a small saucepan, stir together your choice of strawberries, granulated sugar, and water. Set over medium-high heat and bring to a rolling boil. As the sugars dissolve and bubble up, stir consistently with your offset spatula to prevent scorching. Reduce the heat slightly and cook until the liquid transforms into a thick, glossy jam. To test readiness, drag your spatula through the center of the pot: the jam should distinctly hold a clean parting path for a few seconds before slowly easing back together. Pour this reduction into a glass bowl and transfer it immediately to the refrigerator to cool completely.
2. Crafting the Fudgy Sponge Layers
Preheat your oven to 350°F (175°C). Line the bottom of your two 6-inch round cake pans with rounds of parchment paper and lightly grease the sides.
In a medium mixing bowl, thoroughly whisk together your dry components: the all-purpose flour, natural cocoa powder, baking powder, baking soda, and salt. Ensure there are absolutely no pockets of unmixed cocoa left behind.
In a separate large mixing bowl, combine your melted butter, vegetable oil, granulated sugar, and brown sugar. Whisk vigorously until the mixture looks uniform and the sugars begin to dissolve into the fats. Whisk in the room-temperature eggs one at a time until completely smooth.
To prevent the batter from breaking, alternate adding your dry ingredient mixture and the room-temperature milk into the wet base in three distinct additions. Stir gently with a silicone spatula just until the flour disappears; over-mixing at this stage will develop excess gluten, robbing the cake of its melt-in-your-mouth tenderness. Divide the dark batter equally between your two prepared pans (aim for approximately 540g of batter per pan for perfect consistency).
Bake for 40 to 45 minutes. You can verify doneness by inserting a wooden toothpick into the exact center of the cake; it should emerge clean or with just a few moist crumbs attached. Let the pans rest on a cooling rack for 10 minutes before turning the cakes out directly onto wire racks to cool down fully to room temperature.
3. Whipping the Strawberry Frosting
In your main mixing bowl, employ an electric hand mixer to whip the softened butter on medium-high speed until it turns pale and ultra-creamy. Add in the softened block cream cheese, beating continuously for another 2 minutes until completely uniform and lump-free.
Sift in your powdered sugar on low speed to prevent a dust cloud, then kick the speed back up to combine. Finally, pour in the 70g of cooled, reduced strawberry jam along with the vanilla extract. Whip for one final minute until the color transforms into a beautiful, naturally vibrant pastel pink. Transfer roughly half a cup of this frosting into your piping bag and snip the tip off.
4. Slicing and Setting Up the Layers
Once your chocolate cakes are perfectly cold, use a sharp serrated bread knife to slice off any domed tops to ensure they are completely flat. Carefully slice each cake horizontally directly through the equator, leaving you with four distinct, even cake layers.
Place your first chocolate sponge layer onto a cardboard cake round resting on a rotating cake turntable. Using the filled piping bag, pipe a firm, half-inch-thick continuous ring right along the perimeter edge of the sponge layer. This frosting border acts as a retaining wall to securely trap your wet fillings.
Inside this piped boundary, spoon roughly 3 to 4 tablespoons of your cooled strawberry jam, spreading it evenly with your small offset spatula. Directly over the jam layer, scatter a generous handful of your finely diced fresh strawberries, pressing them down very gently into the jam matrix to anchor them.
5. Stacking and the Crumb Coat
Carefully position your second chocolate layer squarely on top of the first fruit filling. Repeat the exact stabilization process: pipe the outer frosting ring, spread the jam base, and distribute the diced fresh fruit. Continue this stacking sequence until your fourth and final sponge layer is inverted and placed on top (bottom-side up for a perfectly crisp upper edge).
Using your spatula, apply an exceedingly thin layer of the remaining pink frosting across the entire top and down the exposed outer sides of the stacked tower. This is your structural crumb coat. Use your cake scraper to smooth it down, pulling off any excess frosting. This step locks in every stray chocolate crumb so they won’t contaminate your final look. Pop the cake into the refrigerator for 30 minutes to set firm.
6. The Final Decorating Touches
Once the crumb coat feels solid to a gentle touch, apply the rest of your strawberry cream cheese frosting generously over the top and sides of the cake. Use your scraper for a clean, modern finish, or intentionally use your spatula to carve elegant, rustic organic swirls into the frosting. Crown the top of the cake by arranging your fresh, halved strawberries in a beautiful circular pattern around the top perimeter.
Chef Luna’s Expert Failure Warnings
As a professional baker, there are two non-negotiable rules you must follow to guarantee success with this recipe:
- Temperature Synchronicity: Your cream cheese, butter, eggs, and milk MUST be at true room temperature before you begin processing them. If you combine cold cream cheese with warm butter, the fats will seize instantly, leaving you with an unfixable, curdled frosting texture filled with hard white lumps.
- The Frozen Fruit Trap: Under no circumstances should you swap out the diced fresh strawberry filling layers for thawed frozen berries. Frozen strawberries lose their structural cellular integrity upon thawing and will continuously weep water into the center of your cake. This excess moisture will dissolve your piped frosting ring, destroy the structural balance, and cause your beautiful layers to slidingly collapse sideways within hours.
Tested Recipe Variations
- Gluten-Free Alternative: This recipe adapts flawlessly to dietary modifications. I have rigorously tested a variation substituting the 190g of all-purpose flour with an identical weight (190g) of a premium 1:1 cup-for-cup gluten-free baking flour blend containing xanthan gum. The result yields an identical fudgy crumb structure that perfectly supports the fresh fruit filling.
- Decadent Chocolate Ganache Drip: For an extra layer of luxury, melt 100g of bittersweet chocolate chips with 80g of heavy whipping cream. Allow it to cool slightly to a warm room temperature, then pour it gently around the top edges of your chilled frosted cake using a squeeze bottle to create a stunning, professional glossy drip effect before placing your fresh berry halves.
Comprehensive Kitchen Storage Protocol
Because this cake features real fresh fruit fillings and a dairy-forward cream cheese base, safe temperature control is critical:
- Short-Term Refrigeration: Store the fully assembled cake inside an airtight cake dome or large sealed container in the refrigerator for up to 3 days. To experience the maximum flavor profile and a perfectly silky frosting texture, always allow individual sliced portions to sit out on the counter at room temperature for 15 to 20 minutes before serving.
- Long-Term Freezing: If you wish to preserve leftovers, flash-freeze individual slices on a parchment-lined baking sheet for 2 hours until the frosting is rock hard. Wrap each slice tightly in two layers of plastic wrap followed by an outer layer of heavy-duty aluminum foil. They can be safely frozen for up to 1 month. Thaw overnight inside the refrigerator before enjoying.
Frequently Asked Baking Questions (FAQ)
Can I bake this recipe using standard 8-inch pans instead?
Yes, you can easily scale this recipe for wider layers. To maintain the exact height and proportions in 8-inch round cake pans, double all of the listed ingredient amounts exactly. Keep a close eye on your oven during the baking cycle, as the larger surface area will require roughly 5 to 8 additional minutes of baking time. Use visual cues and the toothpick test to confirm when the sponges are fully baked.
Why do you utilize a mix of grams and teaspoon volume measurements?
Precision is everything in pastry arts. Baking by weight using a digital scale ensures absolute consistency every time you bake, completely removing the human error associated with varying cup measurements. However, standard kitchen scales struggle with accuracy when weighing micro-amounts under 10 grams. Therefore, tiny chemical measurements like baking soda, baking powder, and salt are kept in standard teaspoons for safety and perfect execution.
My cream cheese frosting is too runny. How can I fix it?
Runny frosting usually occurs if your kitchen was too warm, if your butter was completely melted rather than softened, or if your strawberry jam reduction wasn’t cooled completely before adding. Fix this immediately by sifting in an extra 30g to 50g of powdered sugar and popping the entire bowl of frosting into the refrigerator for 20 minutes to firm up the fats before trying to assemble your cake layers.