Royal Icing Christmas Cookies Ideas are the kind of treat that makes the whole season feel special. They’re crisp, buttery, and hold their shape beautifully perfect for decorating with cheerful designs. Whether you’re hosting a cookie party, making gifts, or baking with kids, these cookies are always a hit.
The best part? Simple techniques and a few smart tools make them look impressive without hours of work. Let’s make holiday cookies that are as pretty as they are delicious.
Table of Contents
What Makes This Royal Icing Christmas Cookies Ideas So Good
- Sharp edges and smooth tops: The dough keeps its shape, so your trees, stars, and snowflakes look clean and professional.
- Easy royal icing: Two consistencies—piping and flood—cover all your decorating needs.
No fancy tricks required.
- Perfect flavor balance: Buttery vanilla sugar cookies pair perfectly with sweet, crisp royal icing.
- Make-ahead friendly: You can bake the cookies and prepare the icing ahead, then decorate when you’re ready.
- Endless design options: From classic to whimsical, it’s easy to create a theme that fits your holiday style.
Ingredients
For the Sugar Cookies

- 2 3/4 cups all-purpose flour
- 1/2 teaspoon baking powder
- 1/2 teaspoon fine salt
- 1 cup unsalted butter, softened
- 3/4 cup granulated sugar
- 1 large egg, room temperature
- 2 teaspoons pure vanilla extract
- Optional: 1/2 teaspoon almond extract for extra warmth
For the Royal Icing
- 4 cups powdered sugar, sifted
- 3 tablespoons meringue powder (or 2 pasteurized egg whites)
- 6–8 tablespoons room-temperature water, divided
- 1 teaspoon vanilla or almond extract (oil-free)
- Gel food coloring (red, green, white, gold, blue, etc.)
- Optional: 1 teaspoon light corn syrup for a slight sheen

For Decorating
- Sprinkles, nonpareils, and sanding sugar
- Piping bags with small round tips (sizes #1–#3)
- Toothpicks or a scribe tool
- Edible glitter or luster dust (optional)
Instructions
- Make the dough: In a bowl, whisk flour, baking powder, and salt. In a separate large bowl, beat butter and sugar until light and creamy, about 2–3 minutes. Mix in egg, vanilla, and almond extract if using.
- Combine: Add dry ingredients to wet in two additions, mixing just until a soft dough forms.
If crumbly, knead gently by hand until it comes together.
- Chill: Divide dough into two discs, wrap, and chill for 1 hour. This helps keep shapes sharp.
- Roll and cut: Preheat oven to 350°F (175°C). Roll dough on a lightly floured surface to about 1/4-inch thickness.
Cut with Christmas-themed cutters (trees, stars, snowflakes, stockings).
- Bake: Place on a lined baking sheet and bake 9–12 minutes, until edges are set and just starting to turn golden. Cool completely on a rack.
- Make royal icing: In a mixing bowl, whisk powdered sugar and meringue powder. Add 5–6 tablespoons water and extract.
Beat on medium speed for 2–3 minutes until thick and glossy with soft peaks. Add more water a teaspoon at a time to reach piping consistency (toothpaste-thick).
- Create flood icing: Transfer half the icing to separate bowls for colors. Thin with water, a few drops at a time, until it reaches flood consistency.
It should smooth out in 10–15 seconds when you run a line through it.
- Color: Add gel colors a little at a time. Stir gently to avoid bubbles.
- Outline and flood: Use piping icing to outline each cookie shape. Let set 2–3 minutes.
Fill with flood icing, using a toothpick to nudge icing into corners and pop air bubbles.
- Dry time: Let cookies dry uncovered at room temperature. Surface dries in 1–2 hours; full set takes 6–8 hours or overnight.
- Add details: Once the base is set, pipe details like snowflake lines, dots, garlands, and lettering with piping icing. Add sprinkles while icing is wet so they stick.
How to Store
- At room temperature: Keep fully dried cookies in an airtight container for up to 1 week.
Separate layers with parchment.
- Freeze baked cookies (undecorated): Freeze for up to 2 months. Thaw in the container before opening to prevent condensation.
- Freeze decorated cookies: Freeze fully dried cookies between parchment in an airtight container for up to 1 month. Thaw in the closed container.
- Royal icing: Store unused icing in an airtight container for 3–4 days at room temp or 1 week in the fridge.
Press plastic wrap directly on the surface to prevent crusting. Re-whisk before using.
Benefits of This Royal Icing Christmas Cookies Ideas
- Great for gifting: They pack and ship well once fully dry.
- Kid-friendly project: Simple shapes and easy designs keep it fun.
- Customizable flavors: Vanilla, almond, lemon—make it your own.
- Budget-friendly: Basic pantry ingredients create a bakery-worthy result.
- Reliable texture: Crisp edges with a tender bite, not crumbly.
Common Mistakes to Avoid
- Skipping the chill: Warm dough spreads and blurs details.
- Overbaking: Take them out when set; they continue to firm up as they cool.
- Wrong icing consistency: Flood too thick won’t settle; too thin runs off. Use the 10–15 second test.
- Stacking too soon: Royal icing needs several hours to fully harden before packaging.
- Using liquid food dye: Stick to gel colors to avoid thinning the icing.
Variations You Can Try
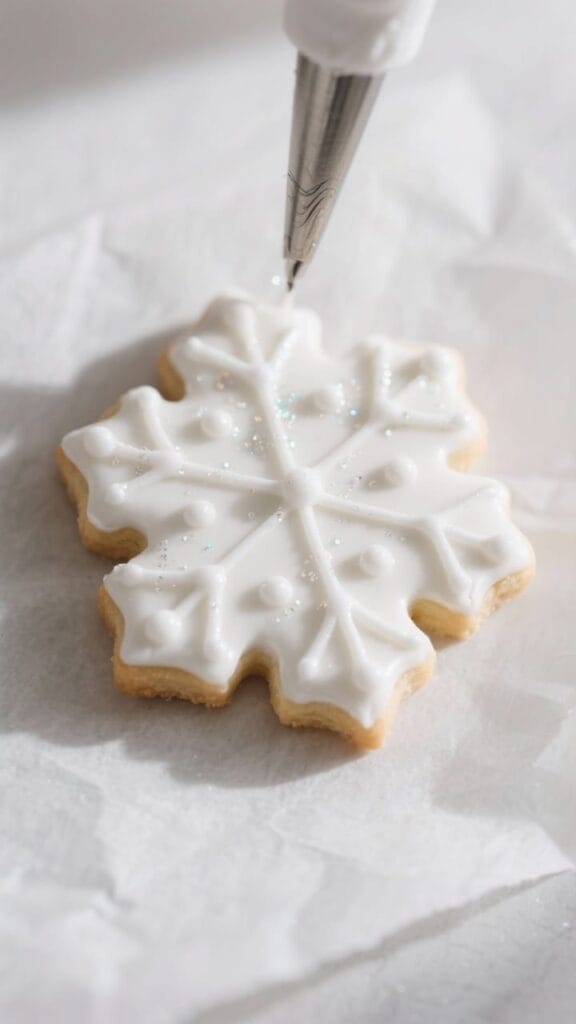
- Classic White Snowflakes: Flood with white, then pipe delicate lines and dots.
Add a touch of shimmer dust for a frosty look.
- Christmas Tree Garlands: Green flood base, then zigzag garlands with red and white. Add gold sugar pearls as ornaments.
- Ugly Sweater Cookies: Use sweater-shaped cutters or rectangles. Flood in bright colors and add playful patterns like stripes and polka dots.
- Plaid Presents: Flood squares in red or green.
Pipe thin lines in black and white to create a plaid effect, then add a bow.
- Gingerbread Men Style: Use the same dough for a different look. Flood tan or keep plain and decorate faces, buttons, and cuffs.
- Peppermint Twist: Add 1/2 teaspoon peppermint extract to the icing and decorate with crushed candy cane edges.
- Snowy Night Sky: Flood in deep navy, let dry, then splatter edible white paint or pipe tiny stars.
- Stained Glass Windows: Cut a small shape inside the cookie, fill with crushed hard candies, and bake. Decorate edges with royal icing after cooling.
FAQ
Can I make the dough ahead of time?
Yes.
The dough can be refrigerated for up to 3 days or frozen for 2 months. Let chilled dough soften slightly before rolling so it doesn’t crack.
Do I need meringue powder for royal icing?
It’s the easiest, safest option. You can use pasteurized egg whites instead, but avoid raw egg whites.
Adjust water slightly to reach the right consistency.
How long does royal icing take to dry?
Plan on 6–8 hours for a full hard set, or overnight if you can. If you’re adding layers or packaging, wait until the icing is completely dry to avoid smudges.
Why are my cookies spreading?
Warm dough, too much leavening, or an overly warm baking sheet can cause spreading. Chill the cut shapes for 10 minutes before baking, and use cool pans.
How do I get a smooth flood without bubbles?
Don’t overmix, let the icing rest a few minutes to bring bubbles to the surface, then gently stir.
Use a toothpick to pop any remaining bubbles after flooding.
What tip size should I use?
Use a small round tip like #2 for outlines and details. For very fine lines or lettering, try a #1 tip.
Can I flavor the royal icing?
Yes, use alcohol- or water-based extracts like vanilla, almond, or lemon. Avoid oil-based flavorings they can prevent the icing from setting properly.
How thick should I roll the dough?
About 1/4 inch is ideal.
Thinner can turn brittle; thicker may bake unevenly.
Can I decorate without piping bags?
You can use zip-top bags with a tiny corner snipped off. It’s not as precise, but it works well for basic designs.
Wrapping Up
Royal icing Christmas cookies are festive, versatile, and easier than they look. With a dependable dough and simple icing techniques, you can create bakery-style designs at home.
Mix and match colors, keep the details clean, and let each cookie tell a little holiday story. Whether you’re gifting or nibbling, these cookies bring sparkle to the season. Happy baking and happy decorating!


Royal Icing Christmas Cookies Ideas – Festive, Fun, and Easy to Decorate
Ingredients
Method
- Make the dough: In a bowl, whisk flour, baking powder, and salt. In a separate large bowl, beat butter and sugar until light and creamy, about 2–3 minutes. Mix in egg, vanilla, and almond extract if using.
- Combine: Add dry ingredients to wet in two additions, mixing just until a soft dough forms.If crumbly, knead gently by hand until it comes together.
- Chill: Divide dough into two discs, wrap, and chill for 1 hour. This helps keep shapes sharp.
- Roll and cut: Preheat oven to 350°F (175°C). Roll dough on a lightly floured surface to about 1/4-inch thickness.Cut with Christmas-themed cutters (trees, stars, snowflakes, stockings).
- Bake: Place on a lined baking sheet and bake 9–12 minutes, until edges are set and just starting to turn golden. Cool completely on a rack.
- Make royal icing: In a mixing bowl, whisk powdered sugar and meringue powder. Add 5–6 tablespoons water and extract.Beat on medium speed for 2–3 minutes until thick and glossy with soft peaks. Add more water a teaspoon at a time to reach piping consistency (toothpaste-thick).
- Create flood icing: Transfer half the icing to separate bowls for colors. Thin with water, a few drops at a time, until it reaches flood consistency.It should smooth out in 10–15 seconds when you run a line through it.
- Color: Add gel colors a little at a time. Stir gently to avoid bubbles.
- Outline and flood: Use piping icing to outline each cookie shape. Let set 2–3 minutes.Fill with flood icing, using a toothpick to nudge icing into corners and pop air bubbles.
- Dry time: Let cookies dry uncovered at room temperature. Surface dries in 1–2 hours; full set takes 6–8 hours or overnight.
- Add details: Once the base is set, pipe details like snowflake lines, dots, garlands, and lettering with piping icing. Add sprinkles while icing is wet so they stick.